Our Master Bedroom in this house is quite large, making it a bit difficult to decorate, and seemingly taking forever. When we moved in, I knew what pieces from our old house/living & dining room, would be repurposed for the space, giving it a glam feel, and painted the walls a medium gray. One of the walls is slanted on the entire side, making it cozy, but again, difficult to decorate. I finally found a bed with a tufted headboard that would fit the space and refinished our old rustic dresser to match as well. See our Master Bedroom Before and my Glam Black and Gold Dresser Makeover
I’ve been dying to create some type of canopy over the bed, because even with the headboard, the slanted wall makes it feel unfinished, and I can’t really hang a mirror or artwork over the space, because I wouldn’t want it looming over our heads as we slept at night. Since I’ve never had a bed with a canopy, and they can be quite cozy and romantic, AND I had two extra panels left over from my window treatments unused, it was the perfect solution… but I still wasn’t sure how.
The Feather Place recently contacted me because of my DIY African JuJu Hat {where I purchased the feathers from}, and asked if I wanted to collaborate on a project. I initially thought I’d do something with a vintage round mirror {which still sits on the floor against the wall, un-hung} -but when I found the amethyst feathers that matched my curtains so perfectly, a feather pendant with bed canopy was my answer.
It still took some time to figure out how I was going to create it and once again a wire basket provided the perfect base for the pendant. I’ve created two pendants to cover ugly light fixtures from heavier duty wire baskets, DIY Eames Inspired Boho Pendant and DIY Rustic Glam Rope Pendant, which worked so well, it was just a matter of grabbing my supplies and getting started.
Here’s What You’ll Need…

* Curtains or drapes to match your bedroom {at least two} with rod loops {making it easier on you} Mine are Argentina Pinch Pleat Panels in Amethyst from Bed Bath and Beyond
* One Wire planter basket {I bought a small and a large to visually determine the size I wanted. They were 3-4$ each at my local nursery – I used the larger/14″diameter}
* Scissors
* Matching heavy duty yarn or twine {for the canopy}
* LARGE needle and heavy thread {almost like embroidery thread, but not AS thick}
* 2-3 hook screws {to hang it}
* Feathers: 4 Bunches total {though I could have used almost 6 } sold strung, by the yard
– 2 yards or bunches of Goose Nagorie Feathers in Amythest $26 each
– 2 yards or bunches Rooster Schlappen-Bronze – Natural/Black/Teal $21 each
* Patience. A lot of patience.
Steps…

* Begin by deciding which feathers will go where on your basket to create your pendant. My light lavender feathers are fluffier/rounded, and shorter than the dark black/teal rooster feathers, so I decided they would go on the top and bottom of my pendant with the longer feathers in the center, covering most of the space.
* This was a trial and error process for me. Beginning at the bottom and working your way up is the best option, but since I was unsure, I began in the top/center, with my longer black feathers and hand-stitched them to the wire basket. I held the feathers in place using my large jaw clips for my hair.

* Continue layering your feathers onto your basket, stitching them to the wires, making sure your stitches are hidden from the front AND that each layer of feathers is covering the top/stitches of the previous or next.
NOTE: This will most definitely test your patience.

* This is what it will look like inside… as you can see, I ran out of feathers, but since my drapes were going to be covering the back, it didn’t really matter.
NOTE: if you’re creating this as a pendant only, without the canopy, you’ll need one more set of each of your feather strands {2 more yards of feathers} for this large pendant.

* Using screw hooks, measure with your feather basket pendant where it will hang and screw them into the ceiling. If your ceiling is flat, use 3 in a triangle shape {follow the instructions here: DIY Pendant Lamp} … since I have a flat AND a slanted surface, I’m using only two, but securing the slanted one in place with extra rope in the end so it doesn’t slip or slide from center.
NOTE: IF you have flat walls, this will be much easier than my slanted wall situation. You can hang it above the center of your bed, if only using it as a pendant OR at the head of your bed, making a sort of crown canopy, with the drapes hanging flat agains the wall.

* Look at your pendant straight on and trim away any fly-aways, or feathers that are longer on one side than the other. The strands aren’t perfect, and some of the black/teal rooster feathers are longer at one end than the other.
NOTE: Lay a towel or sheet down BEFORE YOU DO THIS. I did NOT and these feathers were terrible to get off of my comforter. They wouldn’t even shake off outside, I had to use tape and slowly tap them off with it.

* Your feather pendant should look something like this.
TIP: And add a tassel down the center if you like! You can easily tie it onto the bottom of the basket with rope or string or even a large safety pin if it’s hidden beneath the feathers.
Now for your canopy…

* Since I was using the same drapes that I have as window coverings, I had to remove the extra white/blackout layer so that I could utilize both sides of my curtains. I needed the front to be visible on the pendant, making the back visible against my wall.
* Using a seam ripper was the easiest option up the sides, then I carefully cut away the top so I didn’t undo the pinch pleats.
* Cut pieces of yarn or rope about 12″ long {I only had blue, left over from my DIY Tassels on my Window Shades} and slip one into each of your curtain rod loops to ready them.

* Beginning at the side/front of your feather pendant {shown below}, LIFT your top {lavender} layer of feathers and tie on your curtain panels to your wire basket, hiding the rope or yarn within and trimming away the excess when you’re all finished. You can visually tell where you want your panels to begin on your feather pendant… and since I ran out of feathers in the back, it made it easier tying the remainder of the strings onto the basket.
* Some of your strings may need to be tied to the same wire as your feathers are stitched, just carefully push your yarn up, through, and under… make sure that your feathers cover the strings, but also don’t get disrupted visually by your curtain panel fabric… meaning, hang your curtain a little lower if you need to {as seen in the photo above}.
* Once your first curtain panel is tied on, begin with your second panel on the other side of your pendant, then overlap the two in the back creating a nice swooping visual beneath {against the wall}.

* To keep your panel in place and from pulling up when you drape it on your wall, tie a SECOND string to your first loop, lOWER down on the curtain panel loop to a LOWER wire ring on the basket {see the blue yarn in the photo above? Trim and/or hide that within your feathers to finish it off}

NOW… if you have flat walls and ceiling, you can simply let your curtains drape behind your headboard LIKE THIS PRETTY CROWN CANOPY {using it to keep your curtains in place OR AS a headboard, OR draped to either side of your bed using curtain tiebacks to keep them in place}
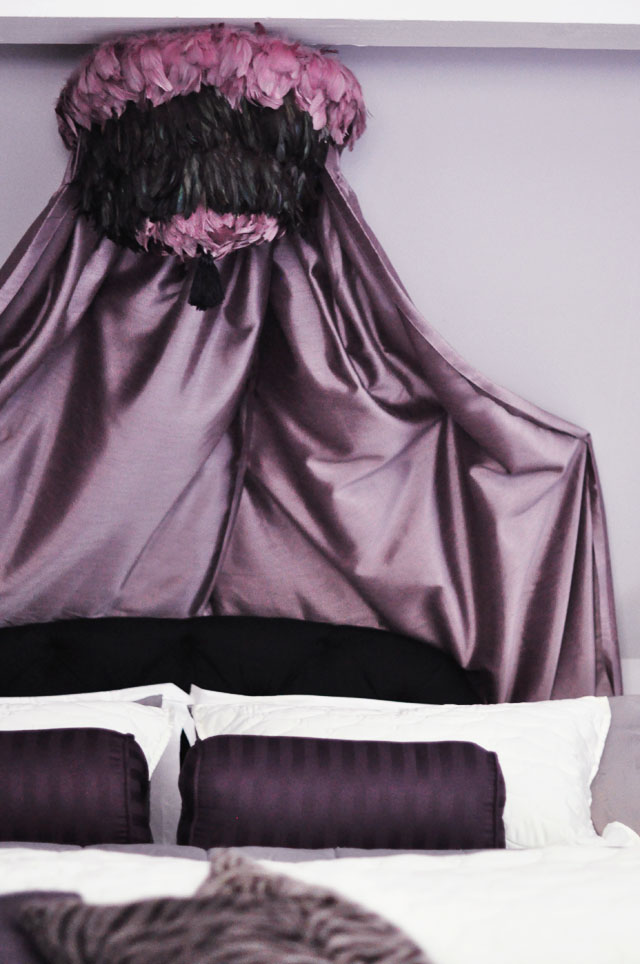
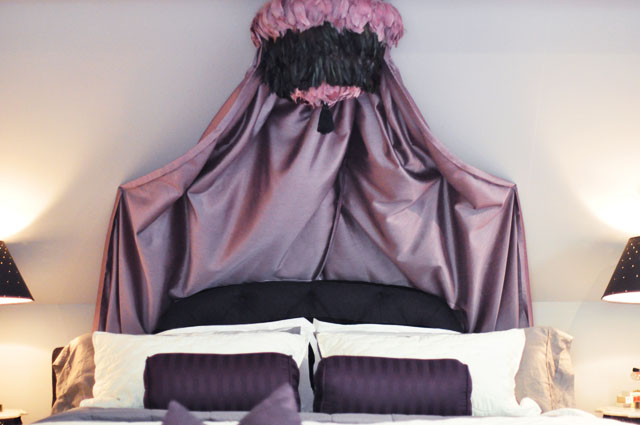
Though I love the way it looks above, simply draped and tucked behind my headboard, BECAUSE I have a slanted wall situation, even when pushed behind my headboard {as seen above}, my canopy still fell too close to the bed and pillows. To fix this, I simply used a few tiny upholstery nails, in key positions {keeping it billowy, but away from the bed} and hammered them in place, then out to the sides, for a royal feeling. You can’t even see them in this fabric. If your fabric is lighter, you may have to disguise the nail heads with cute buttons or give it a tufted feeling.
TIP: Use heavy tape to hold your curtains in place/against the wall to make sure it’s even on both sides before hammering your nails in.
LAST BUT NOT LEAST… Steam all the wrinkles out of your curtains!
And… Voila!


It’s a bit difficult to even tell in these photos that the wall is slanted against the headboard, so in reality, the whole thing looks a bit prettier and more regal than in the photos.

Have Fun!
* Find all my DIYs here
* Find all my Feather DIYs here


