Sure there are tons of fun nail products and polishes available these days that come with texture built right into the bottle, but that’s no fun for a DIYer, now is it? So for my second nail art tutorial collaboration with Suave® Skin Solutions Body Lotion and Q-tips® Precision Tips™ cotton swabs, I made it my mission to create a fun textured manicure with tons of depth that is easy to do and fun to wear. Granted, it was a bit messier and more time consuming than most of my nail art tutorials, BUT as usual, perfection isn’t necessary to perfect it!
Here’s What You’ll Need…

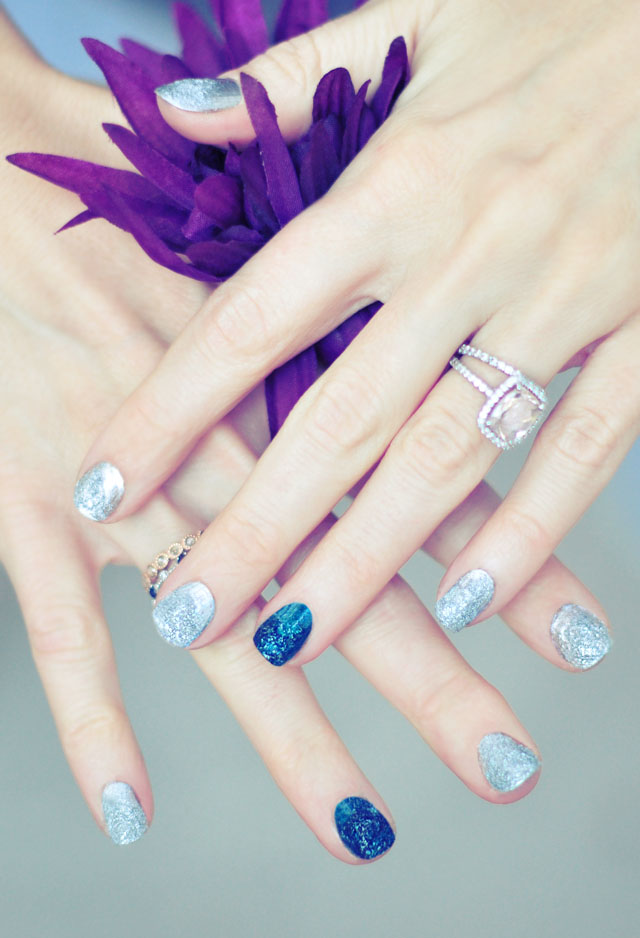
* I used metallic silver polish and shimmery teal for my accent nail {but any metallic colors will do} You get more depth and texture with the shimmery metallics than flat colors.
* A MAJOR top coat
* Felt
* Q-tips® Precision Tips™ cotton swabs
* Suave® Skin Solutions Body Lotions
Optional: Scissors to cut the felt, metal nail art tool {I didn’t find it helpful}, nail file, nail polish remover
Steps…

* I cut my felt first, but it wasn’t necessary. Pull apart your felt so you have little tufts of lint basically, in matching colors to your polish. The finer tufts work the best, break them down pretty small.

Start by giving your nails one coat of color. Then one nail at a time, add a fresh coat of polish and…
1. While your 2nd coat of polish is still wet, place your felt on it. I tried to keep the texture near the top and center, though some nails were too short and the texture took over completely.
2. Using Q-tips® Precision Tips™ cotton swabs, tap and press your felt into the polish to set it in place.
3. Add more of the same color polish to the top of the felt, and press it down and into place with your Q-tips® Precision Tips™ cotton swabs.
4. Add a MAJOR top coat, and again, use your Q-tips® Precision Tips™ cotton swabs to set it in place.
Finish with another clear top coat until they’re relatively smooth.

* And for a step I always include but rarely show, dip your Q-tips® Precision Tips™ cotton swabs into your nail polish remover and clean up the skin around your nails. These pointed tips are perfect for precision polishing!

* If your nail are a bit rough to the touch, use a nail file to soften them down a bit, but make sure they’re completely dry first!
And when you’re done, add another top coat. Use your scissors to cut any flyaways.

* Finish with Suave® Skin Solutions Smoothing Body Lotion with Cocoa Butter & Shea {my favorite} for moisturized skin.
Voila… Voila!


Have Fun!
* Check out last week’s Galaxy Nails!
This post was sponsored by Suave® Skin Solutions and Q-tips®
Share your nail care and nail art inspiration for the chance to win!
Pin your favorite nail art looks and enter at www.Facebook.com/SuaveBeauty for the chance to win Suave® Skin Solutions Body Lotions and Q-tips® Precision Tips™ cotton swabs OR $500 for the ultimate day of beauty and style.