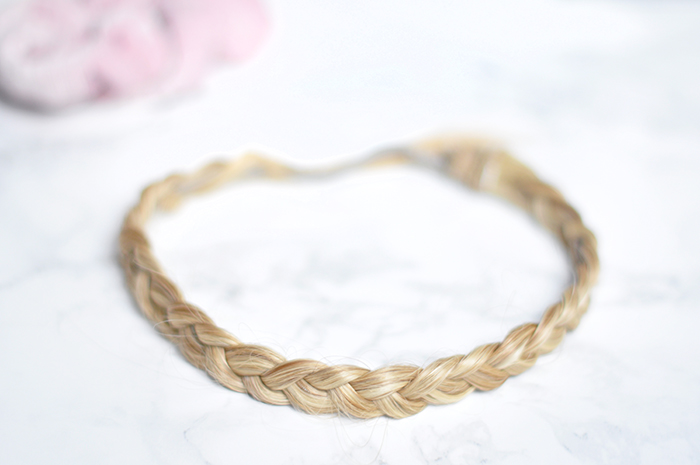
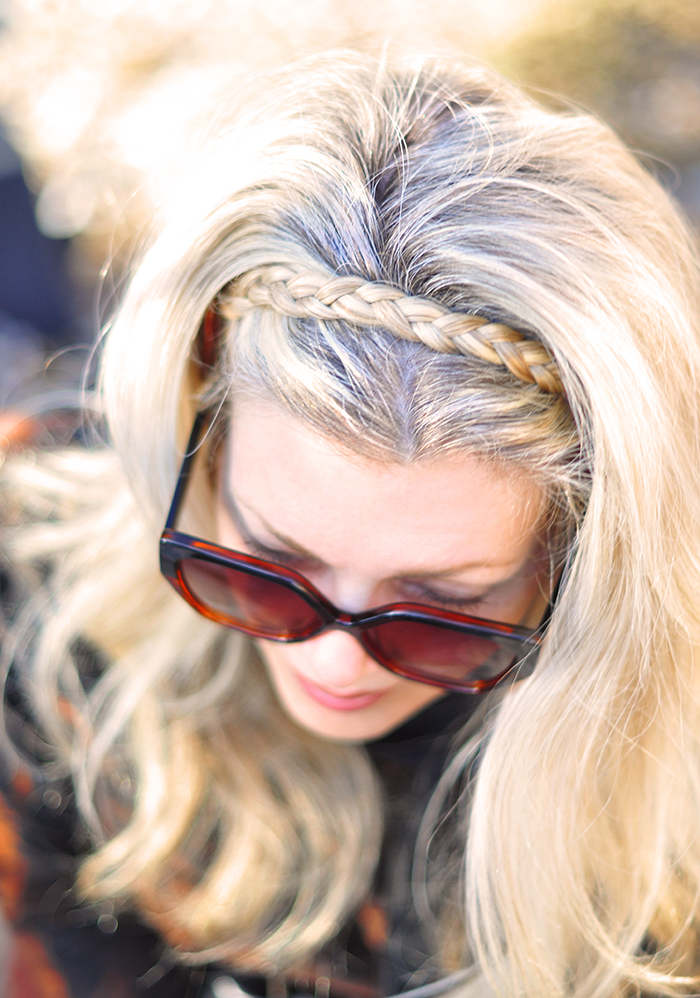
Okay… I’m sure this removable braided headband has been done a million times, or maybe not. I didn’t really investigate because I didn’t care, I just wanted to make one for myself because I’m seeing them pop up everywhere right now and it’s a much simpler option than creating this look with your actual hair! They’re not that expensive to buy if you don’t want to make one, but if you have some extra hair lying around (lol) and some elastic, or even better, a thin elastic headband, then this is a pretty easy tutorial.
NOTE: Everyone in real life was fooled by it when I wore it… and by everyone I mean my mom -because I caved the other day and went to see her… but don’t worry, WE STAYED 6FT APART AND OUTSIDE ONLY… and she shot these photos for me 🙂 and Chad… but I would have fooled more people had I been able to see more people and that’s the point I’m’ trying to make… it looks real!
NOW, I will say that yes, I had these clip-on hair extensions just lying around. In fact, I bought them on Hollywood blvd for $225 way back before my 25th birthday to wear on my 25th birthday which makes them about 19years old. They are real hair, which is why they were so expensive but also, back then hair extensions were really hard to come by! Now, they are everywhere and even the nylon versions look pretty great (they’re usually just shinier and the colors aren’t as perfect, so it’s hard to match your hair) but any long hair extensions will work for this and it’s a pretty simple DIY if you have the tools (though takes a bit of patience)… So let’s get to it!
What You’ll Need…
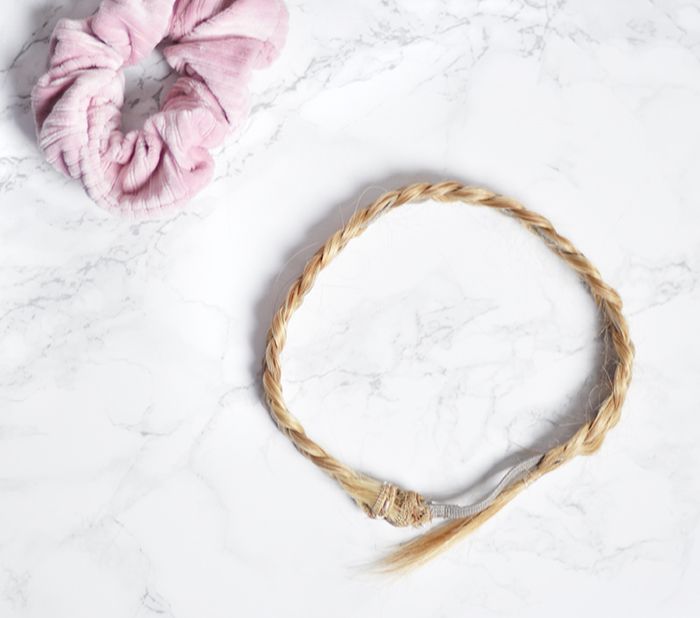
- a href=”https://bit.ly/2Y4XI8j” rel=”noopener noreferrer” target=”_blank”>Hair extension piece (that is sewn together) // at least 20″ long (the longer the better unless you have a tiny head) and 4″ wide. You can use a smaller section like 2″ but you’ll have a much skinnier braid, which you may also prefer. I like the 4″ section because it creates a braid that’s about 3/4″ wide and it looks like a real amount of hair you’d use to create this look with your own hair on your head, compared to many of the ones I’ve seen for sale which are so thick and look obviously fake. Also, a 4″ section covers the elastic headband base without a problem. If you have a hair extension that is longer than 4″ you can just cut it down to size.
- Thin elastic headband, or thin elastic you can stitch in a circle and make your own headband. Mine is 1/4″ that I bought in a pack from Rite Aid ages ago.
- Tiny clear elastic hair tie
- Needle and thread – for this particular DIY tutorial.

ALTERNATE DIY OPTION // I chose this DIY method because I wanted to be able to use my hair extension again in the future if I needed to… IF you have a hair extension you aren’t worried about re-using, you can INSTEAD simply braid it, then glue, tie or sew on a short piece of elastic to each end -creating a circle headband, wrap the ends with ribbon to conceal and glue in place. It’s a much simpler way to create the same piece THOUGH you have a little less give so make sure to measure your braid and elastic accordingly.
* Using the elastic headband in the method I chose creates a bit of an elasticity within the braid, making it fit nicely and easy to adjust without slipping.
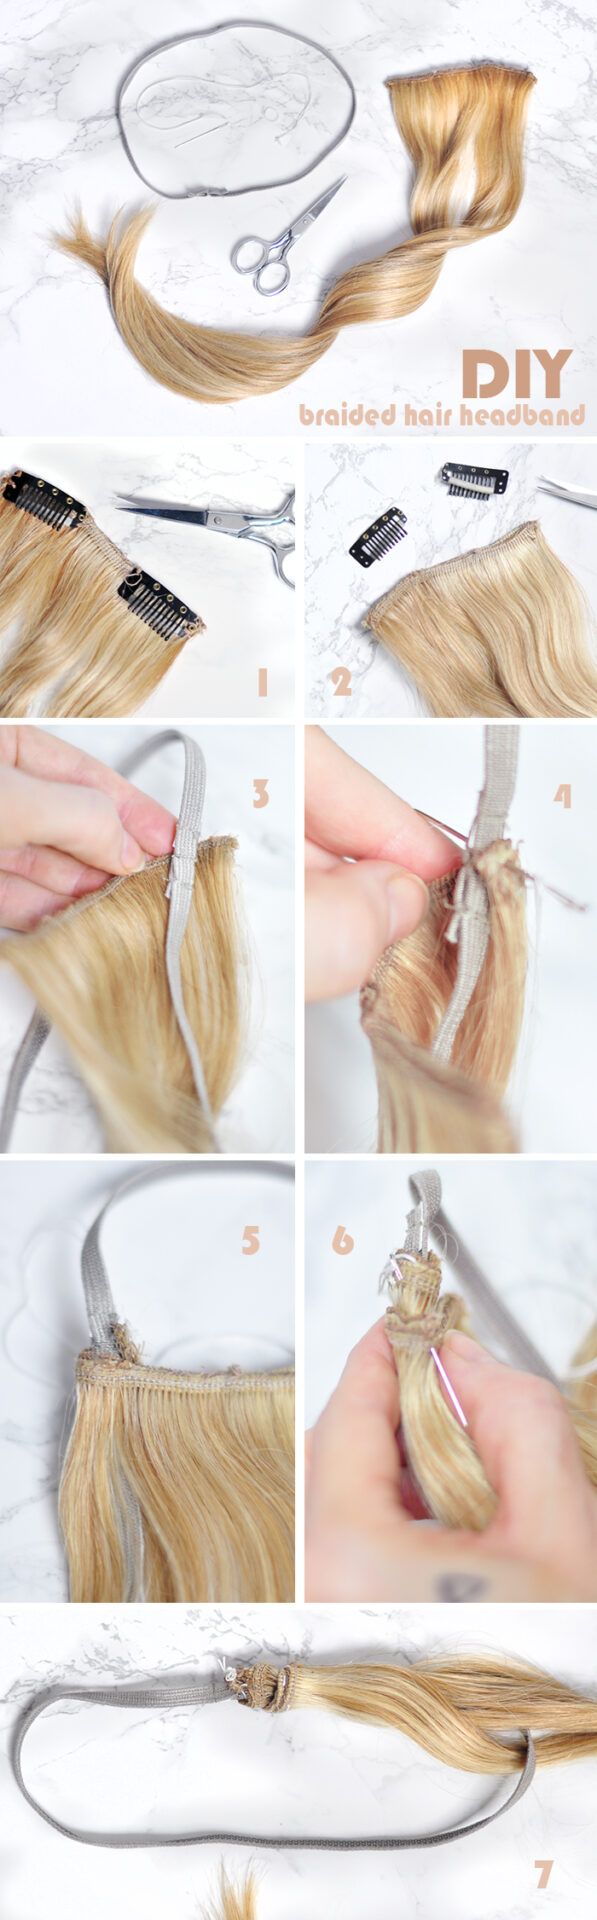
Steps… 1 – 7
1 & 2. If you hair extension has clips on them, simply snip the attaching threads with scissors and set to the side.
3. Begin at the seam of your headband if it has one, if not, begin anywhere you like (this just makes a nice starting point) …hold the under side of your hair behind the headband, leaving about a 1/4-1/2″ out to the side…
4. Fold over that half-1/4″ or so section and stitch it to your headband.
5. In a downward/spiral motion, wrap the hair little by little (not too tightly) around the headband and stitch in place to secure.
6. Continue wrapping and stitching in a downward spiral until your hair is attached securely to the headband. Knot your thread and cut off the remainder.
7. It will look something like this.
NOTE: The downward motion is to not only extend the hair a bit, adding an inch or so of extra to the end, but also to make this area less bulky.
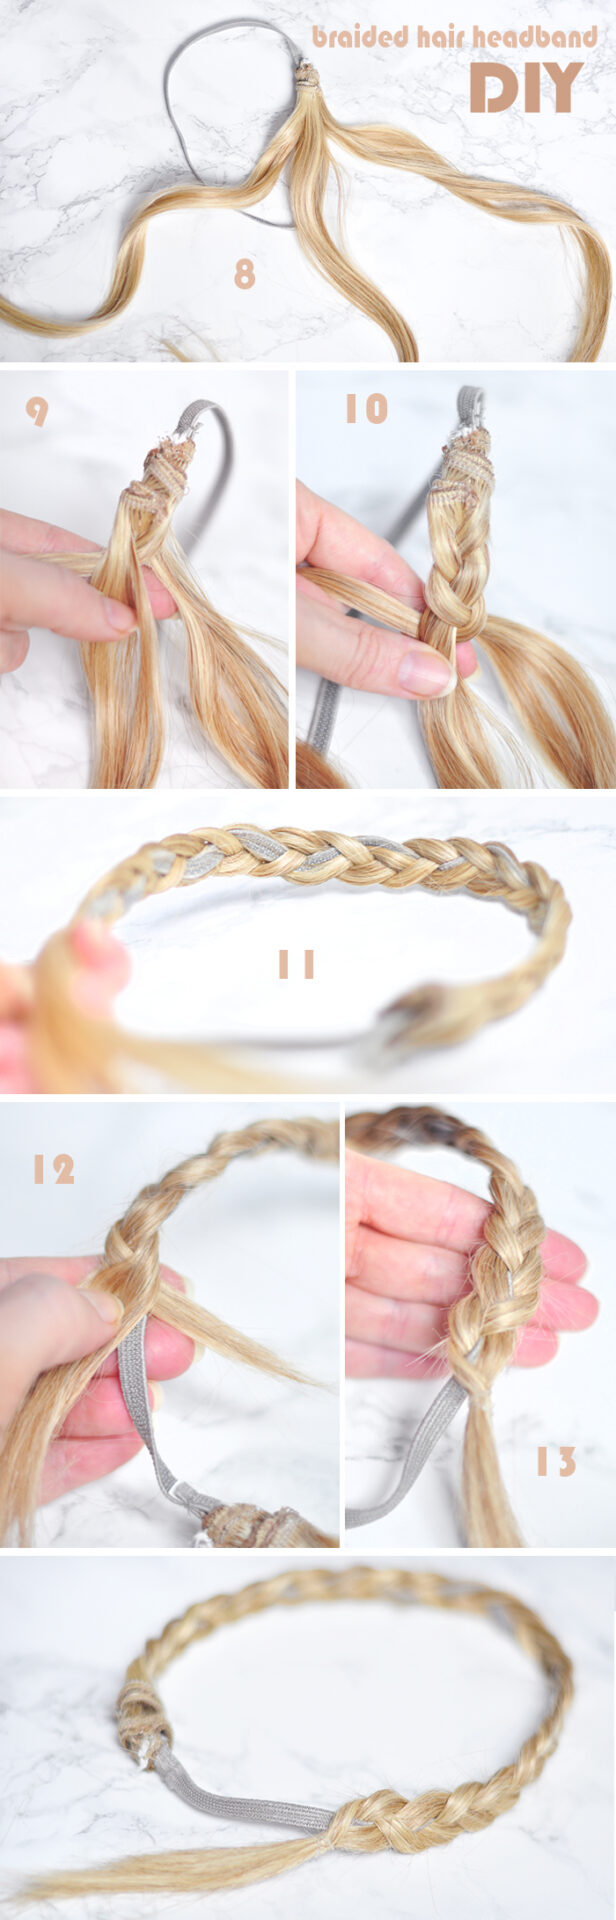
Steps… 8 – 13
8. Separate your hair into three sections, as you would to do a regular braid. Make sure your center section lines up with your HEADBAND and has a little bit MORE HAIR than the other two sections (this is to make sure your headband is completely hidden within the hair, especially if it is not a similar color)
9. Begin your braid by crossing the right section over the center and the left over the center section and so on and so forth.
YOU WILL BE BRAIDING YOUR ELASTIC HEADBAND INTO THE HAIR BRAID. It’s simple to do, just make sure when you cross over your section, the headband is not only hidden among the hair, it’s laying FLAT on top of the other section.
10. Continue braiding by following the steps above.
11. If you do it correctly, braiding the headband within your braid, it should look like this ON THE UNDER SIDE. The top side will be completely hidden and just look like hair.
12. When your hair becomes too fine at the end to braid with the headband, continue braiding it WITHOUT THE HEADBAND for as long as you can.
13. Using a clear baby elastic, tie off your end and leave it hanging.
It’s not the prettiest finish I’ve done, but it works really well!
NOTE: When you try it on, the ends of your hair headband (the bulky side and the thin side) should hit at the base of your neck, about an inch or so down from the back of your ears (depending on your head size, lol). By leaving the hair at the end of the braid out, it will allow you to adjust the bulkier side lower to hide more and the braid ponytail will lay flat against the headband or it will just stick out like regular hair and look natural. If it’s a problem, you can simply tuck it in. Mine wasn’t a problem at all.
Also Note that this braided headband is best worn with hair down to make it look natural. If you want to wear it with a high ponytail or updo, it will look less natural overall, obviously because you’ll see the base and elastic (unless you very carefully create your ponytail with partial hair up and the lower hair to cover it, if that makes any sense at all)… if you have an extra long hair extension that will braid all the way around the headband, just make sure to leave about 2-3 inches of elastic unbraided so you can stretch it enough to get it on. Again, if it’s long enough hair left-over, you can wrap the hair around the headband and bulky side with your extra hair once it’s on your head.
Also Also Note… if you want your braid a little messy, you can pull the braided sections out a little bit in each crossover area, which will also make the braid a little fuller as well.
And… Voila!
Also Also ALSO Note… quarantine roots. What can you do?
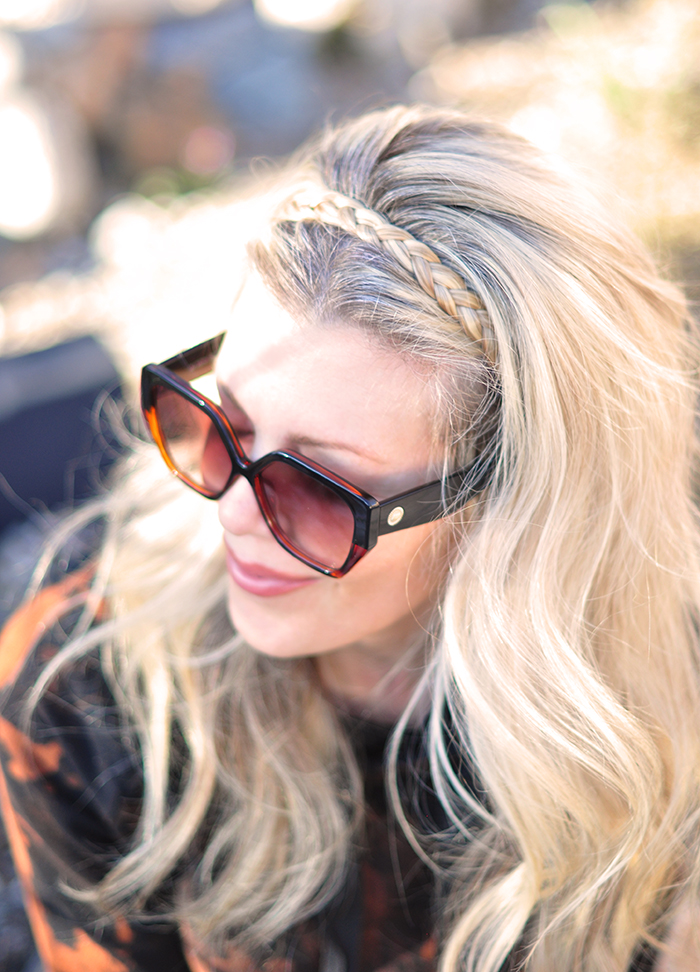
PS. These are the Sunglasses I’m wearing by le specs (they’re $59 and my new faves!)
Have Fun!
* Find all my DIYs here
* Find all my DIY Hair Accessories here
* Find all my DIY Hair Tutorials here