I feel like I’ve dragged these DIY Harley Quinn costume posts out for so long but I promise it was purely by accident. The costume has so many details and DIY elements that putting them all into one post would have been far too epic for words… so this one will focus mainly on the DIY leather harness, which was the most fun part of the costume to make.
It’s difficult but easy if you follow the steps and it turned out amazing, if I do say so myself. I used industrial strength velcro for all the parts but if it were a real harness vs a costume, I’d use a combination of hand-stitching, rivets, and snaps for the pieces that need to be removable. But the entire thing is adjustable and I just love it!
I have to admit that my 7 years working with a leather accessory designer came in rather handy for this project.
Go to my DIY Harley Quinn Corset tutorial to see the inspiration for this costume.
Here’s What You’ll Need…

- Black leather or faux leather
- Red ribbon 1-1/2″ wide – thick with a bold wired edge
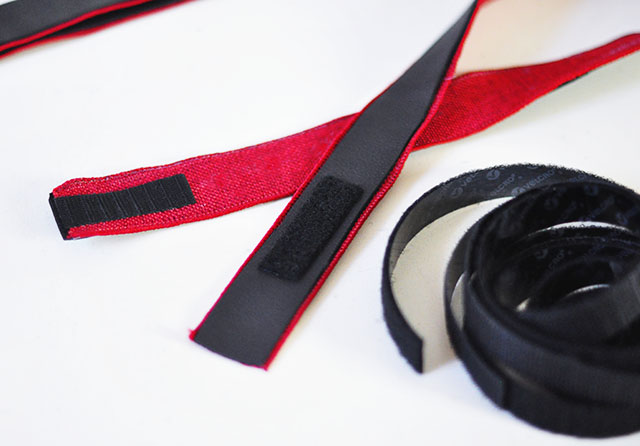
- Industrial strength self-adhesive velcro
- Hot glue gun + glue
- Scissors
- 8 Silver O-rings {found mine at the hardware store}
- Large round rivets or jewels
Steps…
First begin by cutting 1-1/4″ leather strips from your leather, the longer the better. I just used scissors but if you have a leather strap cutter, this step will be FAR EASIER and quicker.
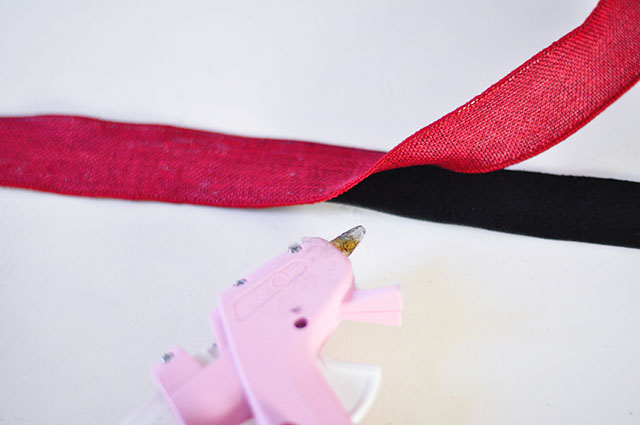
Hot glue your red ribbon to the suede side of your leather so that the red piped edges show on either side of the front.
I made about 8 strips about 40″ each and shorter.
TIP: If you can, pull out all the wires from your ribbon. I DID NOT DO THS, and they ended up poking me like crazy in certain areas.

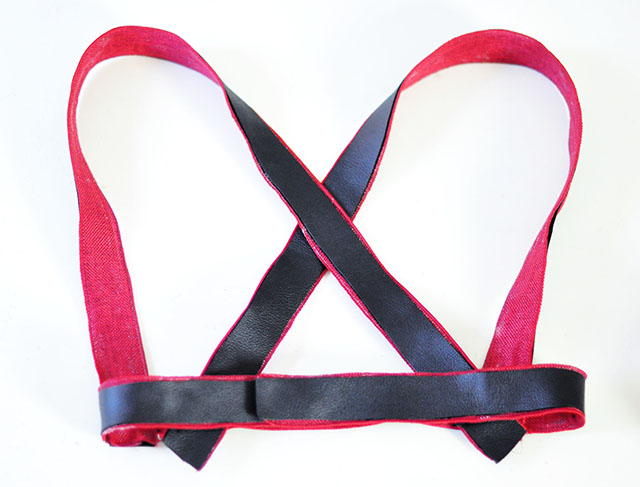
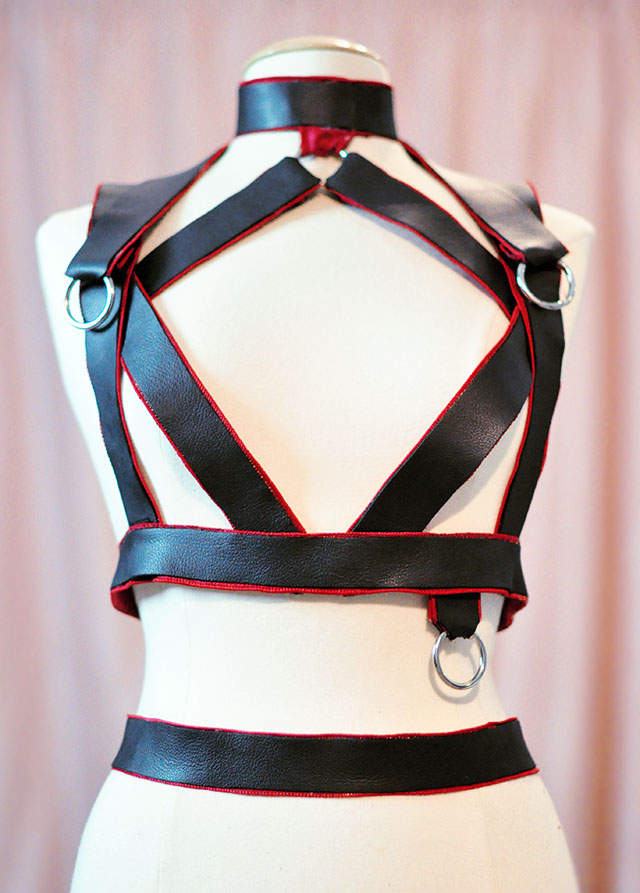
Begin with your longest straps and create a belt using velcro to fasten it in the back. This belt will hit at the largest part of your RIBCAGE and will be the BASE of your harness. You will create another belt that will sit alone and around your waist at the end.
TIP: You’ll be wearing this OVER your corset – or maybe not – so make sure you give yourself some leeway on sizing, using a long piece of velcro so you can strap it on or over a variety of sizes.
Next you’ll need two more long leather straps.
You’ll create this harness ON YOUR BODY because it’s just easiest that way, so put your new belt on and make sure it sits right about where your ribs are

Now grab two more long straps… tuck one end of one strap into the front of your belt {as shown above} just on the outside of your bra and cross it over the back and tuck it into the back of your belt where it feels most comfortable.
YOU MAY NEED A HELPING HAND WITH THIS PART because you want to make sure that your straps sit correctly and if your arm is up adjusting areas, the strap will be too high.
Once you’re happy with the placement of your straps, use velcro between the two pieces to hold it together. These pieces of velcro may never need to be removed, so if you’d rather use rivets here or stitches, feel free… but self-adhesive velcro is the easiest {for costume purposes}.

Remove your harness base by simply unlatching your belt, and slipping your arms out of it and pull it over your head. Remember tat the X goes in the back.
Cut off the excess strips that show beneath your belt in the front and the back.

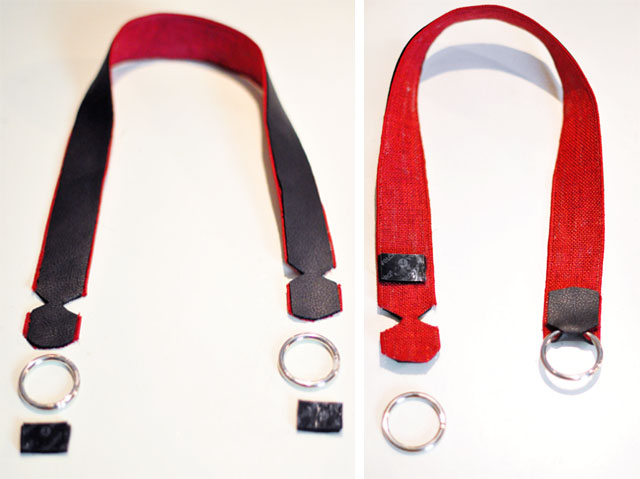
Now you will begin with the choker…

Using one of your smaller strips {assuming that you’d have smaller strips as I did due to the variations in leather} measure around your neck and create a choker using velcro as a closure.

Try on your choker so that it’s comfortable and not too tight and mark the center with a pen.

Pull your leather apart from your ribbon in the center large enough for another ribbon to fit through it.
With about 4 inches of ribbon {or leather – but ribbon is easier here}, slip an O-ring through, center it and fold it in half.

Slip one side of the ribbon through the open hole and the other side of the ribbon on the back and hot glue it like crazy back down to the leather…. finish it by adding another piece of ribbon OVER the glued area and make sure it’s sturdy af.

Try on your finished choker with your harness base.
Add two smaller leather straps beginning the near center of your belt {harness base} and diagonally up to the arm straps and velcro in place {as shown above}.

Now to finish the choker which will also strap anto the harness arm straps.

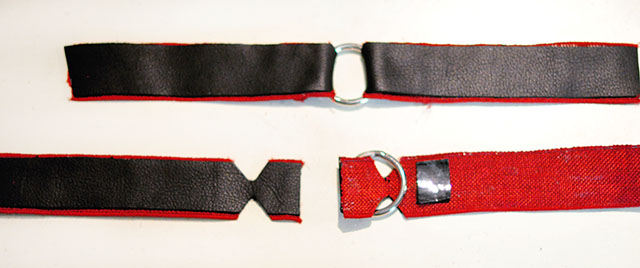
Take two shorter strips and notch the ends as seen above. Fold each over your choker’s O-ring and velcro into place.

It will look like this.

With your harness on your body, take your choker straps and velcro them into place in the same spot -but beneath- the new straps you just added as seen above…
Trim all the excess straps at the end.
This is the only piece that is totally removable {well, it’s all removable, but this is the only piece you have to undo to get in and out of this although I know it looks like a crazy contraption}
Grab a leather strip and rest it around your neck. Make sure it’s long enough to hit/end at the same intersection as all your other straps do on your arm straps.
Notch the ends just like you did for the choker, pull them through the rings and attach them to themselves with velcro THEN attach them to the TOP of your harness with another piece of velcro so they stay put on top of your harness.

This is how your harness should look…

You can get into it and out of it in three steps…
1. Remove the top neck rest with o-rings on either side from one or both sides.
2. Unlatch your choker
3. Unlatch your belt
Carefully pull your arms out and slip out of it.
Make a second belt that sits alone at or around your waist with a long leather strap and velcro to close it.
To Finish your Harness…
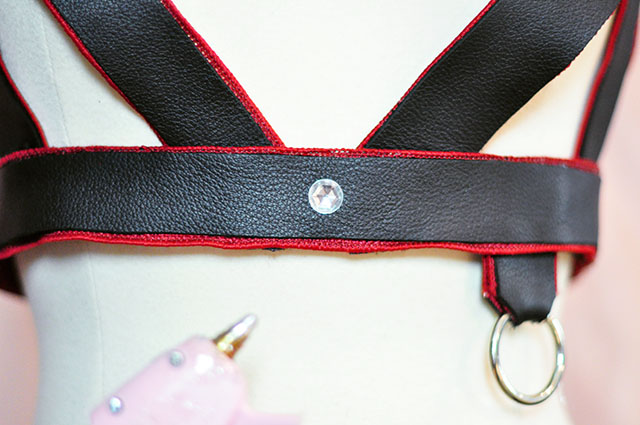
Hot glue gun your studs, rivets, or in my case, large round gemstones to your belt beginning in the center and working your way out to the edges. I stopped at the sides
If you notice the small hanging leather flap with the ring, you make that the same as you did the resting neck piece, but smaller like for the choker and just velcro that bad boy onto the backside of your belt as well.
The arm bands I made separately and not attached to the harness. They were made the same way as the choker and neck rest but with the ring in the center and the velcro attaching them like a bracelet to close. They stayed on perfectly fine without slipping down my arm at all {I was actually surprised by this!}
And… Voila!


Since this post is so long, I’ll have one final post with all the DIY costume elements including the skirts, the white shirt, the boots, the arm bands, tights, and the bat.
Find my DIY Harley Quinn Corset tutorial and Harley Quinn Makeup and Hair tutorials for the rest of the look until then!
Happy Halloween Month!
* Find all my DIY Halloween Costumes here
* Find all my Harley Quinn costume tutorials here