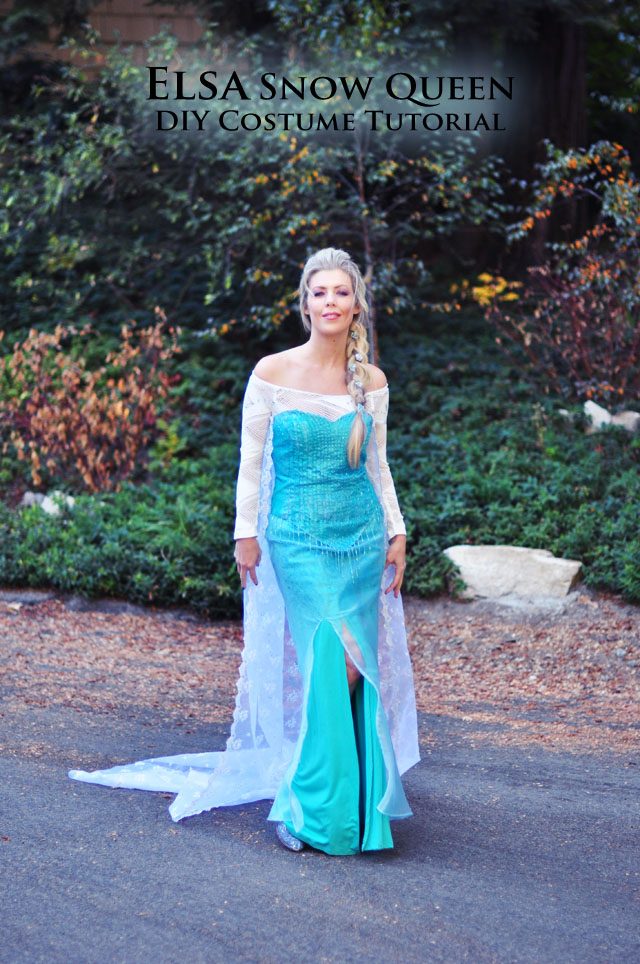
Last year when I worked for Babble, they asked if I was interested in creating beauty looks for Halloween based on any of the Disney Princesses. OF COURSE, I was, because, how fun! And since I used to write for both beauty and style, and love a good DIY, I was able to leverage a few posts for both categories with one Princess.
After doing Cinderella, Tinker Bell, and Merida, I thought Frozen was the next obvious choice. It took me a while to really gear up for the task, which is why this week has been a Frozen Extravaganza, and a little late to actually help anyone with their costumes, but I had to give it a go anyway.
While I’m not necessarily partial to the Elsa character in Disney’s Frozen -or maybe I am just a little– my choice to create Elsa’s costumes over Anna’s was based purely on the fact that Elsa’s hair is blonde/white vs Anna’s hair, which is red –and my hair is already blonde, obviously. Red would be fun, however, I did red last year with Merida, so it would be similar to that to achieve the color. I thought it would also be a fun challenge to re-create both of Elsa’s hair styles {her bun & her braid}, and I was right. I have thoroughly enjoyed this process.
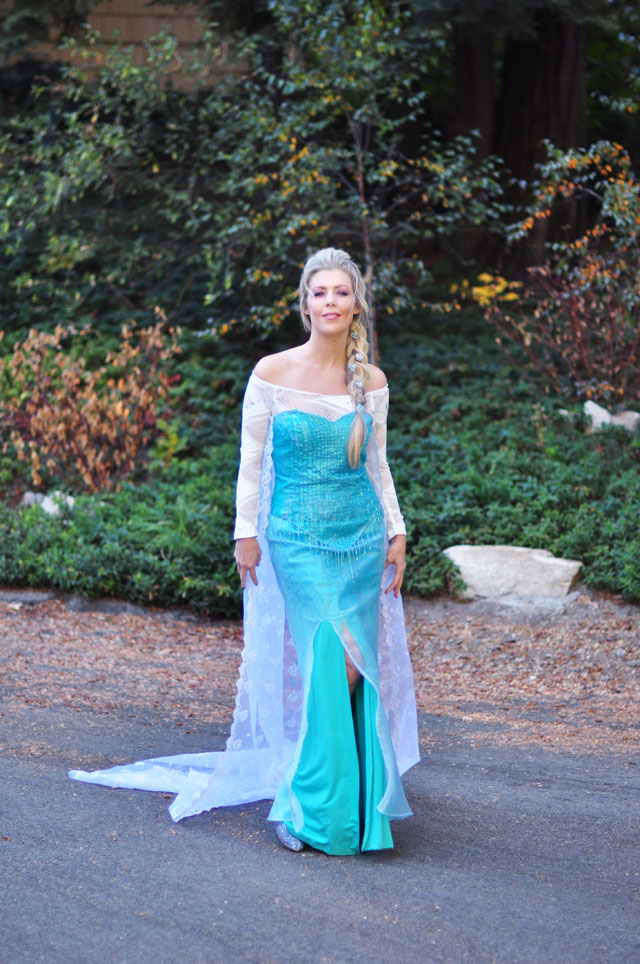
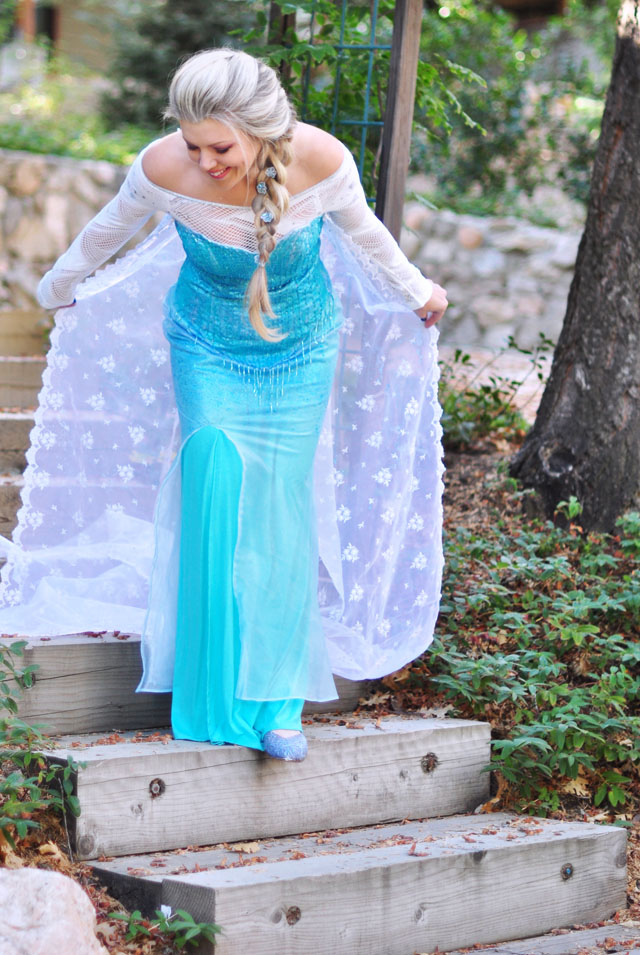
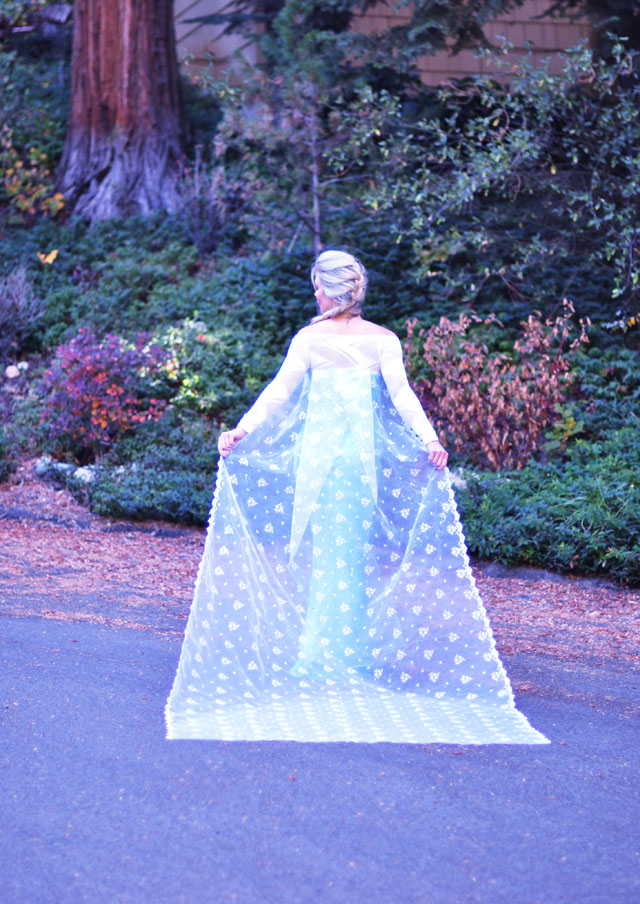
I was very much hoping it would snow the day I was finally ready to shoot photos of the final costumes {which was Monday, btw}, but it did not. I tried to add a bit of a blue tint to the finished images to really capture the Frozen feeling, but it’s just not the same. Maybe when it snows, I’ll get all dressed up again to shoot new photos, because it will be so worth it. The cold never bothered me anyway! 😉
The costume is a fun one. It falls somewhere in between easy and ridiculously time consuming, but I managed to find a handful of pieces to make it work, and finished it in 2-1/2 days.
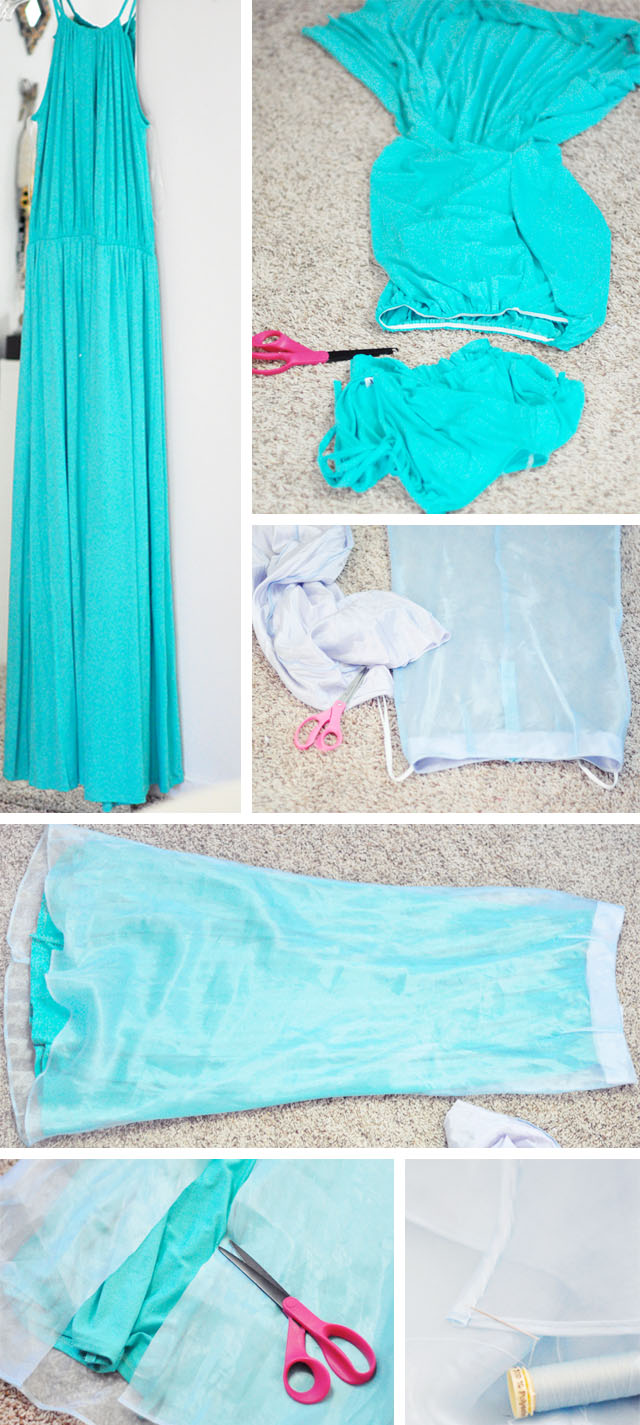
Here’s What My Base Dresses Looked Like Before…

Like I said in my DIY Queen Elsa of Arendelle Costume Tutorial {before she “let’s it go”}, it took me forever to find the perfect dress for this costume. Sure I could have sewn one from scratch, but I hate sewing {mostly it’s the following patterns part and/or draping} and so I wanted a great base to begin with and I wanted a challenge, so much so that I also didn’t want to buy an already pretty teal aqua dress in a similar shape, because there are PLENTY on Amazon alone {like this one, this one, and this one in particular}.
So I searched every thrift store in my area and found a strapless ivory gown I thought I’d dye with Kool Aid –which was a total fail because polyester barely takes Rit Dye, so of course it didn’t take the Kool Aid dye mix I created {even though it was the absolute perfect Elsa aqua blue color}.
I almost gave up when I remembered a little store about 15 minutes away that I’d passed a few times and noticed hanging dresses on mannequins by the entryway. I thought they must have something that could work. And they did.
I bought a total of three pieces from them. The dark teal dress from my alternate Elsa costume + the maxi dress shown above {of which I was going to use together to create this look} but then I also found this icy-blue two piece dress with flower embroidery along the top, {which I removed and used to create Elsa’s Snowflake Hair Clips} and its metallic shimmer made it the better choice.
In the end, the lining to this two-piece dress was too purple and I used the maxi dress as a lining instead and it worked like a charm… You’ll see…
Here’s How I Did It…
Let’s Begin with the Skirt…
1. My maxi dress had an elastic waist, making it a ready-made skirt, so I carefully cut the top off.
2. Next I carefully cut the lavender lining from under my skirt, keeping the waist and zipper intact.
3. Notice how the color is the perfect aqua once layered under the shimmery blue.
4. Next I tried both skirts on and since the maxi dress already had a slit, I moved it to the front/right leg, then mimicked it in the top icy blue layer. NOTE: I should have really stitched the two together because if you notice in the photos, the slits RARELY line up.
5. Carefully run a hem stitch along your slit to keep it from fraying. Kind of unnecessary since it’s a costume, but at least it will stay in good shape.
Now Onto the Bodice…
Elsa’s bodice has a sweetheart neckline and a pointed V bottom. As you can see, my bodice is straight along the top and the bottom. Here’s how I created a similar look…

Steps to Create Elsa’s Sweetheart Bodice with pointed bottom…
1. Remove floral embroidery with a seam ripper and save for other projects — like her hair accessories.
2. Try on bodice, find the center and give it a quick/straight snip.
3. Remove it and continue the slit about 1-1/2 to 2″ long. Fold each side under all the way to your chest darts to create a sweetheart look, then hand-stitch them to the lining of your bodice.
4. My two piece dress came with a shimmery scarf in the matching fabric, I folded the end to create a triangle and cut it from the rest.
5. Keeping it folded in half for strength, I pinned it the back/center of the bottom of the bodice to create the point, then stitch it onto the lining as well.
Other than the seam in front {which I was able to disguise somewhat with glitter}, I think it turned out quite nice.

Now for the Beading…
Elsa’s bodice looks exactly like square and rectangle shaped teal sequins. And while such a fabric/textile does in fact exist, I was too late to have it delivered in the time I needed. So I had to come up with another way to get the look of vertical shimmer, and beads were the closest I could find. I actually bought out all the teal/aqua beads at the local craft store but mostly only used these long tube shaped ones to get the look. I painstakingly HAND BEADED the entire front of my bodice, and was really surprised with how pretty it came out. It’s not too difficult, but takes a steady hand and PATIENCE. I began Friday night and finished Saturday night until I ran out of beads.

1. I began at the center of my sweetheart neckline, knotted my thread, strung it through the back of the lining, strung a bead on it, then stitched it down to just the top layer of my fabric… then on and on, in a straight line until I reached the bottom where I tied a knot and trimmed the excess.
2. From then on, I started from the bottom and beaded up to the top, stitching each bead in place. It was easier to hide the thread at the neckline if I started at the bottom.
3. I spaced them about a half an inch apart to begin with and as my bead stock ran lower and lower, I spread each side out a little more each time.
4. I beaded evenly on both sides in case I ran out of beads so my bodice wouldn’t be lopsided, but I had enough to finish the entire triangle pointed section.
5. Notice once I got beyond the center of my bodice, I began curving my beading to the sides near the top to create a little more depth.
6. I did this all by eye, but if it’s easier for you to stay in the lines, use a ruler and a light pen to dot on a grid to follow.
7. Once I realized I had enough beads, I added the danglers to the bottom of my V, so that it would blend better with my skirt. Also, if you really look at Elsa’s skirt, it has shimmer lines running down it at the top. I tried to get the look with this effort and took it all the way to the edge of the bodice instead of stopping at the edge of my V like the rest of the beading.
Now to Get the Perfect Aqua/Teal Sparkle…
Like any real shimmery fabric, Elsa’s dress color, cape, and undershirt all change colors quite often. From light aqua to deep teal and everything in between based on the background colors of the movie, Elsa’s dress seems to change minute by minute. To capture the colors, I used fine glitter in aquas, teals, blues, and silvers, mostly by Martha Stewart. Fine glitter is the best option here rather than chunky glitter, since it really achieves a fabric-like effect. To get it to stick without making my fabric stiff, I used this AMAZING Glitter Spray Paint for fabric, which I found in blue. My glitter stuck to it like glue!

1. Lay out your fabric on a protected backdrop {I use old shipping boxes from packages received} and get your Glitter Spray Paint and glitters all ready with open caps and all.
2. Test your spray paint first, checking the nozzle for the right mist so you don’t get clumps, then mist on your spray paint wherever you want it to land.
3. Starting with my greenest aqua teal, I immediately sprinkled it all over my bodice from ABOUT TWO FEET ABOVE my fabric. This is important… if you’re too close, you’ll waste your glitter and it will go on too thickly in some areas and not thick enough in others.
4. Repeat the step above with all your glitters, spray painting your glitter spray first {and layering on} your glitters over it all. Seriously, this stuff is genius, my fabric still felt like fabric and my glitter was really on there for good!
5. If you want to, while your paint is still wet, wipe off your beads only for a little more depth and sparkle.
6. Next I added just a fine layer of glitter on the top of my skirt to blend well will the bodice.
7. Let it all dry over night.
NOTE: My sprayer got stopped up and wouldn’t work, even after washing it. I found an empty spray bottle with a BIG sprayer instead and just stuck it in the paint bottle and it worked like a charm.
Now for Elsa’s Cape…
Elsa’s cape, like her long sleeves, is sometimes white and sometimes shimmery aqua blue. I think in reality it’s white but since illustrating white is so difficult, every time the background changes in the movie, so does her cape. It also has snowflakes on it, very much like this pretty shimmery snowflake fabric but alas, I had no time so I remembered this sheer white fabric with pretty floral embroidery and pearls that I used for my Haunted Mansion Table Setting a few years ago, and it actually worked REALLY WELL. From far away, it looks like little snowflakes and that makes me happy.

1. I knew I wanted to use my entire yardage here, so to keep it from fraying, I rolled over and hand-stitched the side that would become the top of my cape {shown at the top/back of my bodice}.
2. I added a little sparkle to the top of my cape using the same method as I did to achieve my bodice and skirt, just far less. I wanted a little shimmer, not a lot. I laid it flat, then folded in the two sides, knowing it was far too wide to be used as it was, but I didn’t want to cut it because I wanted the pretty lace scalloped edges on either side… and let it dry overnight.
3. I attached it to either side of the bodice, as Elsa’s is {folding the bodice in half to match it up}, and stitched about 3-4 inches on both sides, leaving the rest open so I could get into my bodice.
4. Folding each side under, as I did when I added the glitter, I stitched the center of the cape to itself, then attached a hook and eye to either side so I could get into the bodice with the cape open, then hook the tops onto the back of the bodice once I was in it. It looks harder than it really is.
Now for Elsa’s Long Sleeved Sheer Shirt…
I originally was going to use a pair of shimmer white sheer tights for this by cutting off the feet and cutting out the crotch, then using the legs as arms… this really works, I swear! But then I remembered this old white stretchy shirt I had in a box and thought it was a better option. Like her cape, this top changes from white to aqua to blue, but I thought white was the best option to match my cape. I wish the entire thing was netted, but the shapes almost oddly match the shapes on her sleeves… so it was good enough for me.

1. Find a stretchy, shimmery, or sheer white shirt you can wear down off of your shoulders.
2. Using silver glitter puffy paint, I created her sequined look around the neckline knowing that puffy paint will stretch with my shirt when I put it on. There aren’t many other options for this.
3. I tired to create her designs with the puffy paint as well, but it didn’t really come out, so I simply sprayed my glitter paint and added silver and blue glitter. you can’t see how shimmery it is in the photos, only around the neckline, but it worked out. Let it dry over night.
It’s best to get everything ready for glittering and do it all at once so that it can all dry overnight together.
Last but not least… Shoes!
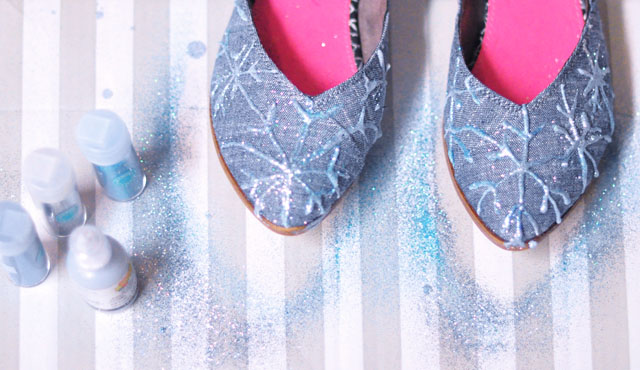
I wanted to wear heels but my skirt was too short, so I found that these TOMs flats I had in my closet were kind of the perfect denim blue and instead of recreating Elsa’s actual shoes, I just puffy painted snowflakes on them and added glitter…. I glittered the soles as well to hide the brown color… They work.
And… Voila! {finally}
I think this is the longest post in the history of posts!



Have Fun!
Looking For…
* Elsa Makeup Tutorial
* Queen Elsa of Arendelle Hair Tutorial – Twist with bun and bangs
* Queen Elsa of Arendelle DIY Costume
* Elsa Hair Tutorial ~ Snow Queen BIG BRAID w/DIY snowflake clips
Click through for… Elsa’s Big Braid Hair Tutorial

Happy Halloween!!!
Elsa Hair Tutorial // Snow Queen Big French Braid Halloween Costume
Elsa Hair Tutorial ~ Twist w/ Bun & Bangs // Queen of Arendelle

