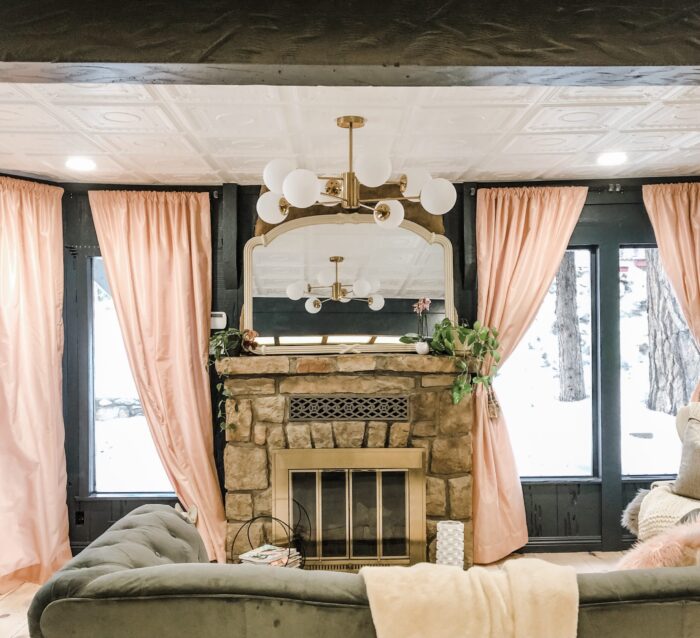
Well, I must admit that I have not entirely finished decorating my office sitting area BUT I finally received my globe chandelier/pendant light fixture and was so excited to share I thought it wouldn’t really matter.
And even though I really didn’t capture many angles of the space (oops), this is the sitting area you may have already seen in my outfit shots where I include my mirror selfies. So, once I finalize the space, I’ll share it again I suppose, but for now I thought I’d share how we turned this horrendous ceiling into something that’s totally chic on the cheap…
Well, okay it wasn’t THAT cheap actually (probably about $400 total), but it was far less expensive than demoing the ceiling and re-drywalling it, and of course I had free labor, because Chad 🙂 but I could have done this myself with a helper, though it probably wouldn’t have turned out as good, but it’s doable, and is a great option to cover ugly ceiling situations… and I thought long and hard about how I was going to make it happen…
So let me show you….
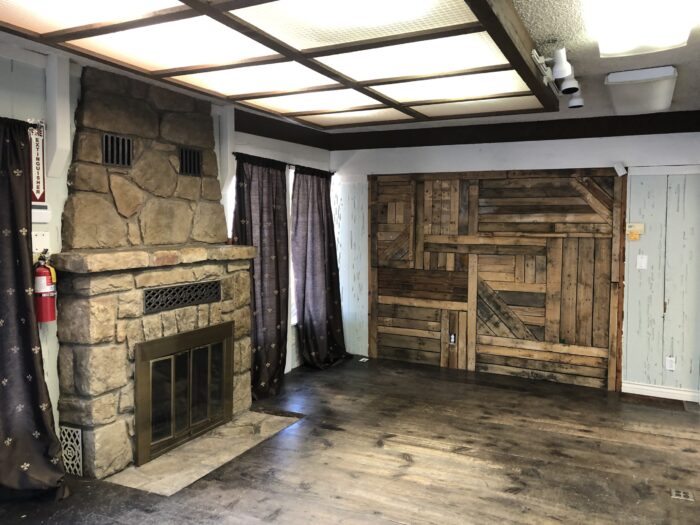
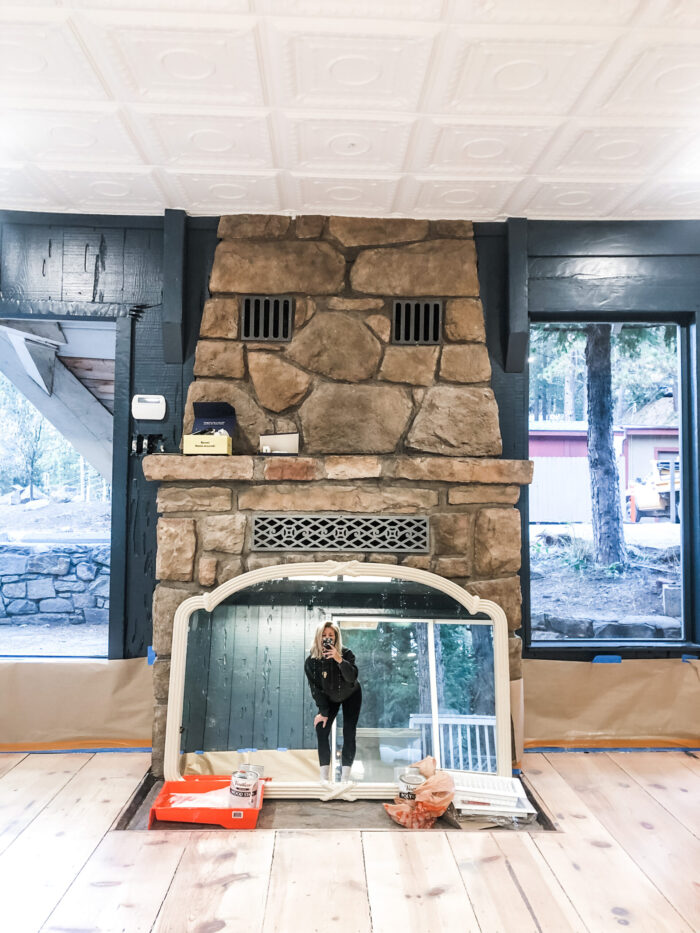
Here’s what my office sitting area looked like BEFORE…
NOTE: I chose to leave the wood plank wall and fireplace as they were to keep a tiny bit of the rustic mountain vibe in this space that is otherwise very feminine and “pretty”. I wanted to make sure it had a little grittiness and hinted at mountain cabin because well, that’s what it is 🙂
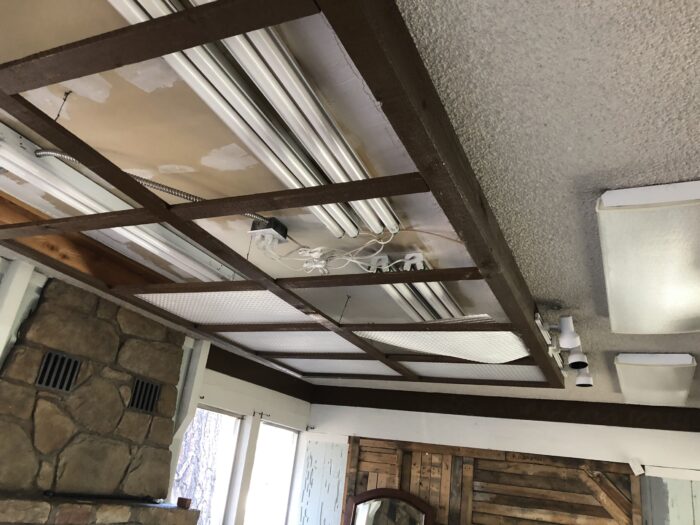
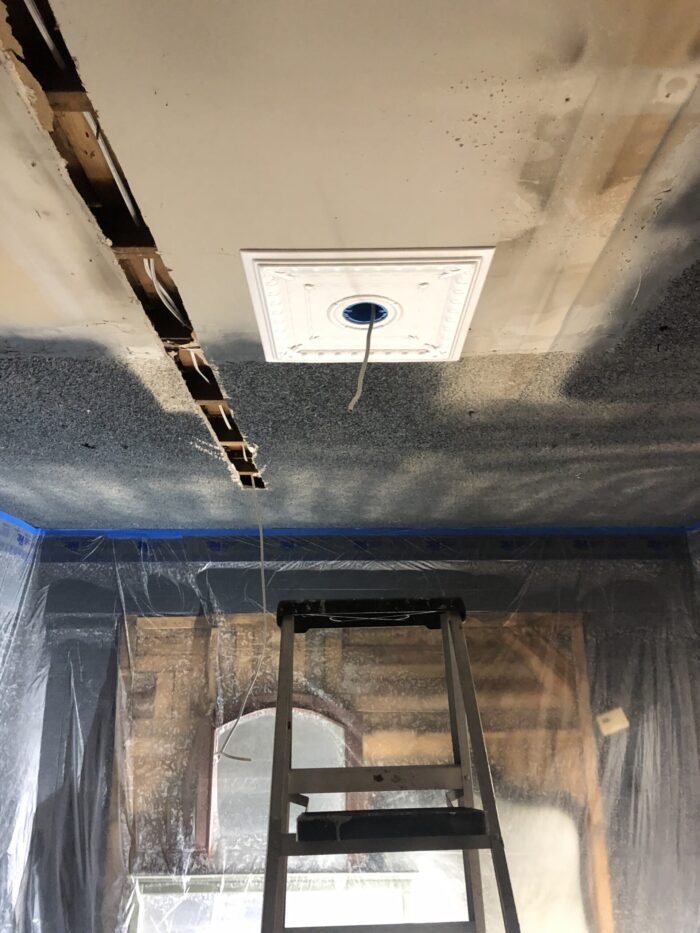
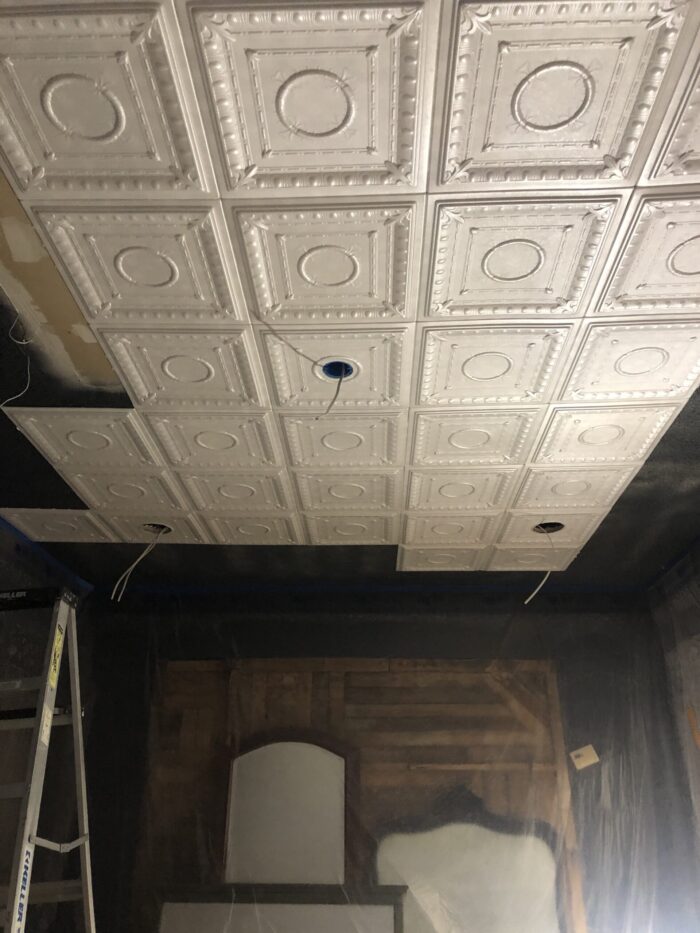
The ceiling was half textured popcorn and half drop down DIY fluorescent light box with smooth drywall behind it, flanked by more fluorescent lights and track lighting.
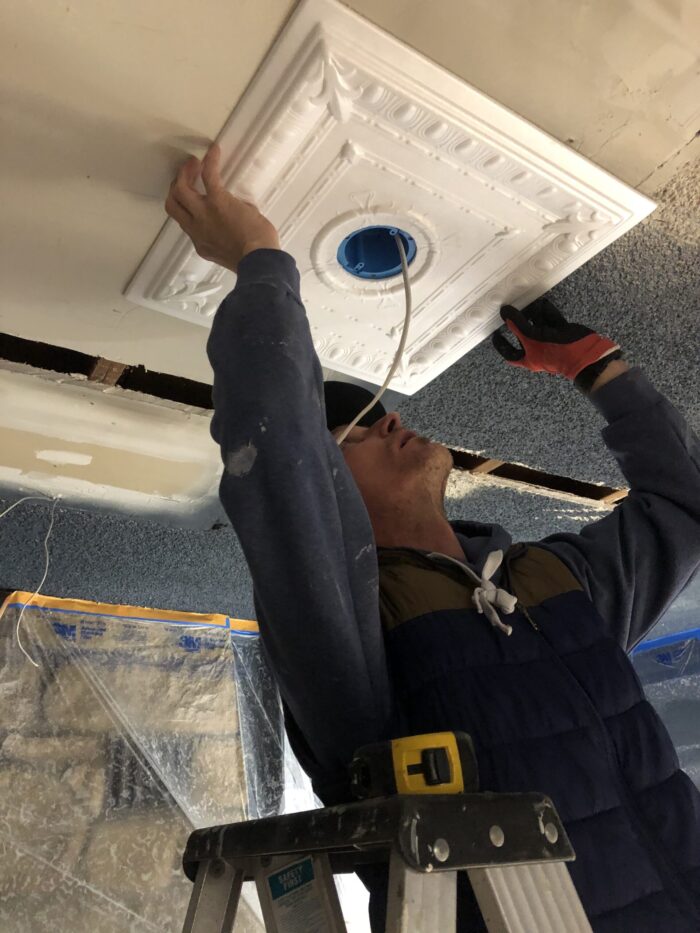
I wanted all of the lighting gone and since Chad is an electrician, he ripped all the outdated electrical out and refitted it with 4 can lights and a spot for a center pendant.
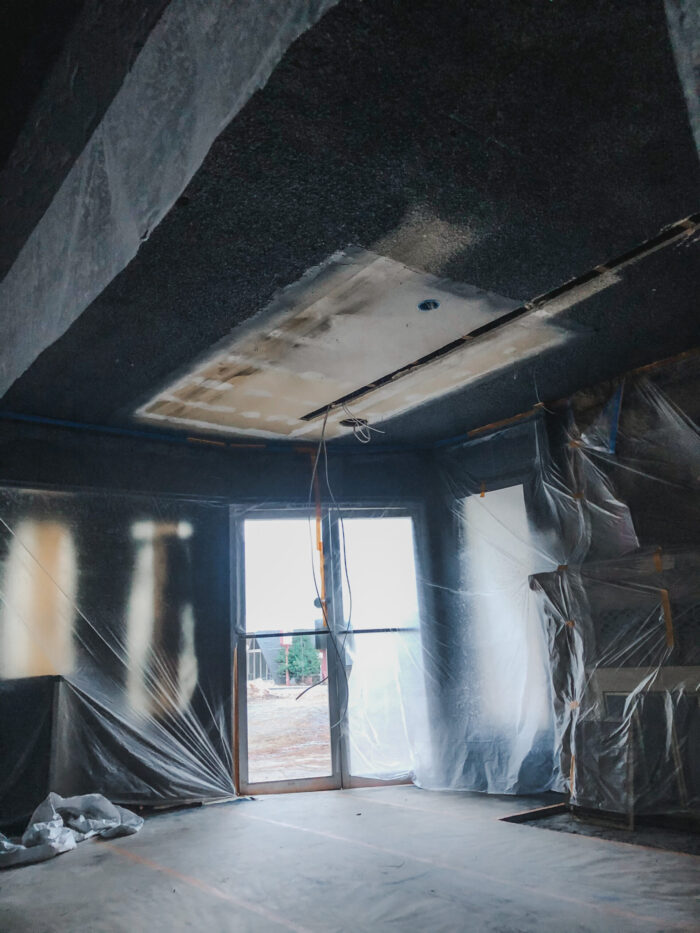
In progress…
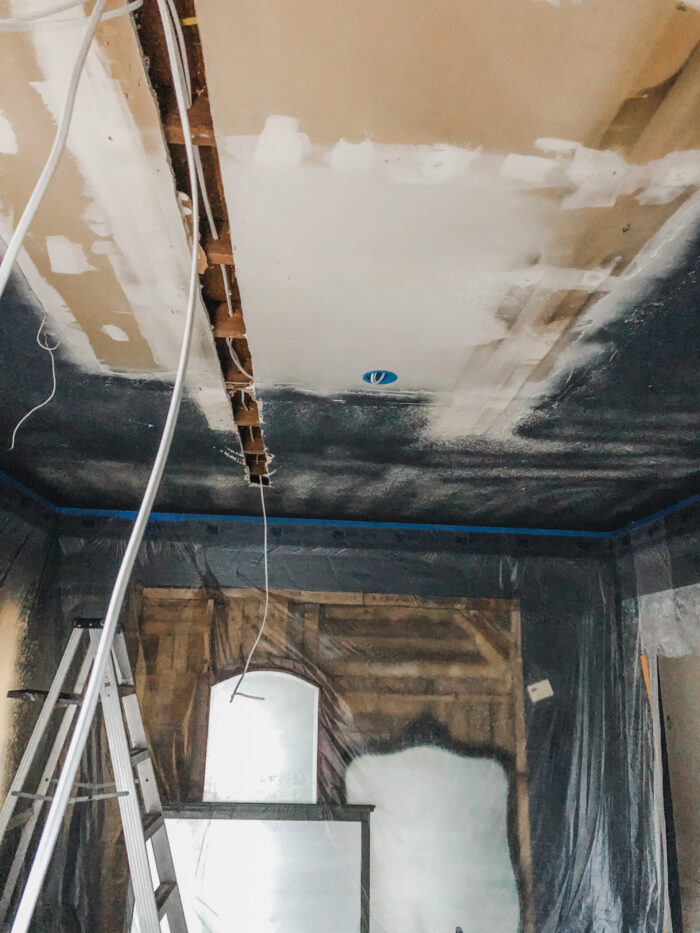
Here is what it looked like after some of the electrical was updated and the walls were painted. You can see the mismatched ceiling and the thought of scraping the popcorn mortified me because you never know if there’s asbestos in there, so instead, I decided to cover it all up!
Another bonus of the styrofoam tiles is that they add an extra layer of insulation in this old building that really helps with temperature control in both winter and summer.
So here’s how we installed the ceiling tiles…
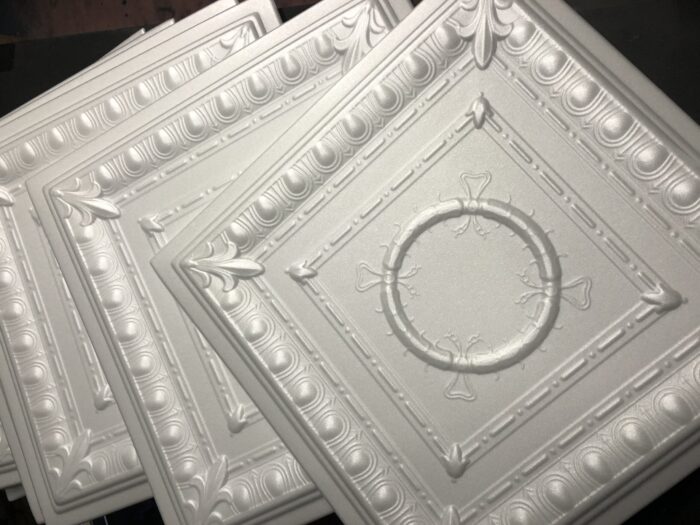
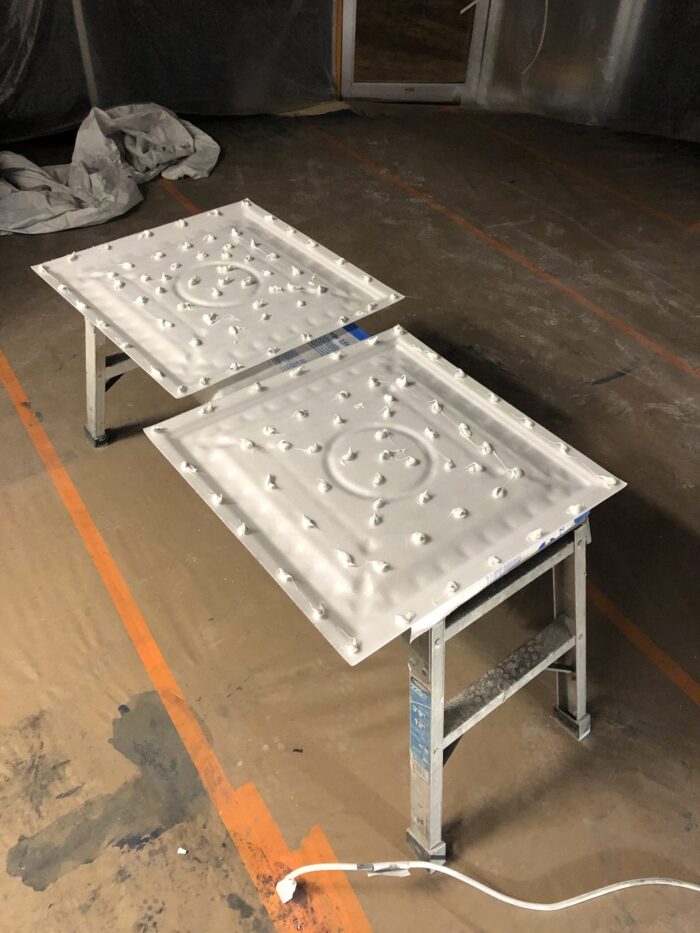
They have tons of different styles, but I went with A La Maison Ceilings R47 Romanesque Foam Glue-up Ceiling Tile and ordered 96 tiles to make sure I had enough to cover everything and a few extra just in case we messed up. We have a few left over, which is great for future use or just in case something happens.
The Styrofoam ceiling tiles arrived in two boxes in packs of 8 and are 19-5/8″ x 19-5/8″ square. They are super lightweight, but don’t bruise easily, if that makes sense, are pretty easy to cut for light fixtures and have a light sheen to them.
We watched a few videos to make sure we installed them properly, but it’s pretty simple actually.
The trickiest part is making sure you have enough glue on them and getting their placement right.
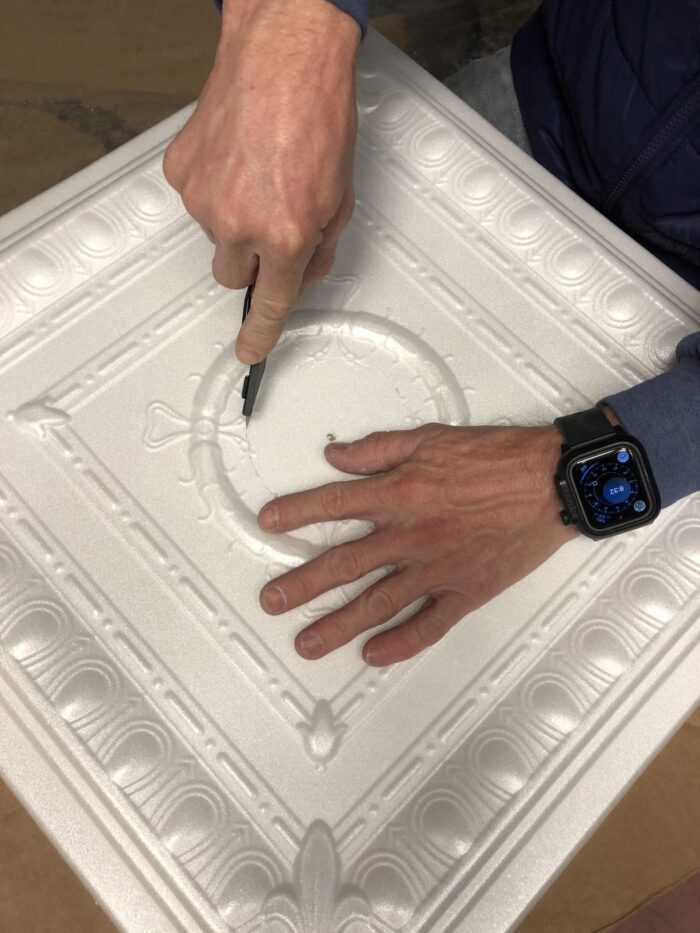
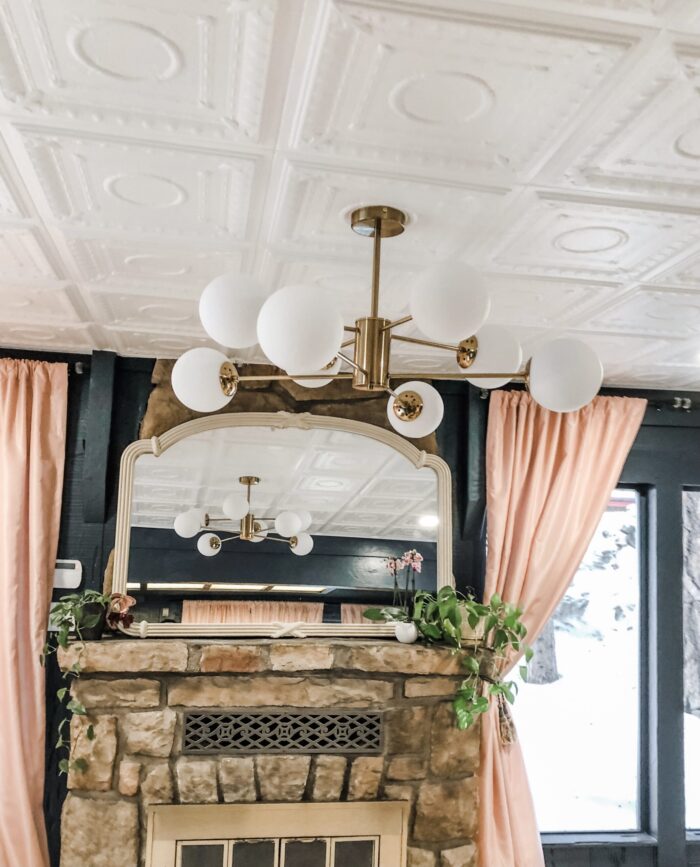
They say to begin in the center and work out… our center happened to be an electrical box for my pendant light Chad wired, so that’s where we started.
I knew I’d have a few can lights in the ceiling as well as this pendant, which is one of the reasons I chose this design since it would disguise the circular mounts really well.
Chad measured the electrical outlet and cut a circle out of the center of the tile.
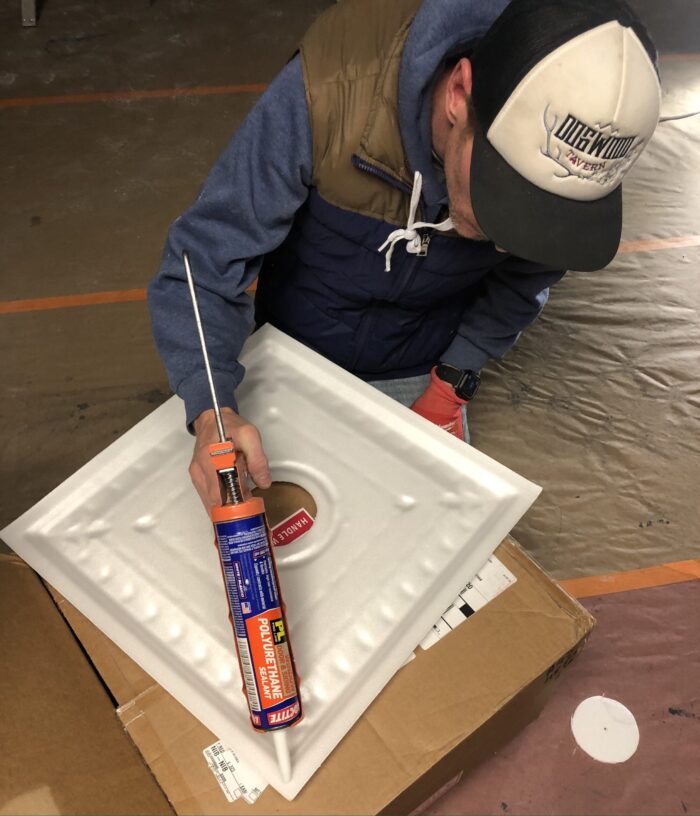
There are tons of different glue/adhesive options but Chad swears by this one, Loctite PL S40 White Window, Door and Siding Polyurethane Sealant and it happened to be available at Home Depot and way less expensive than the options I was seeing on Youtube, so we went with it and it worked well… though we put A LOT of glue on.
ALSO: we went through A LOT OF GLUE! This was what much of the cost went to. We got about 4-5 tiles out of one tube of glue.
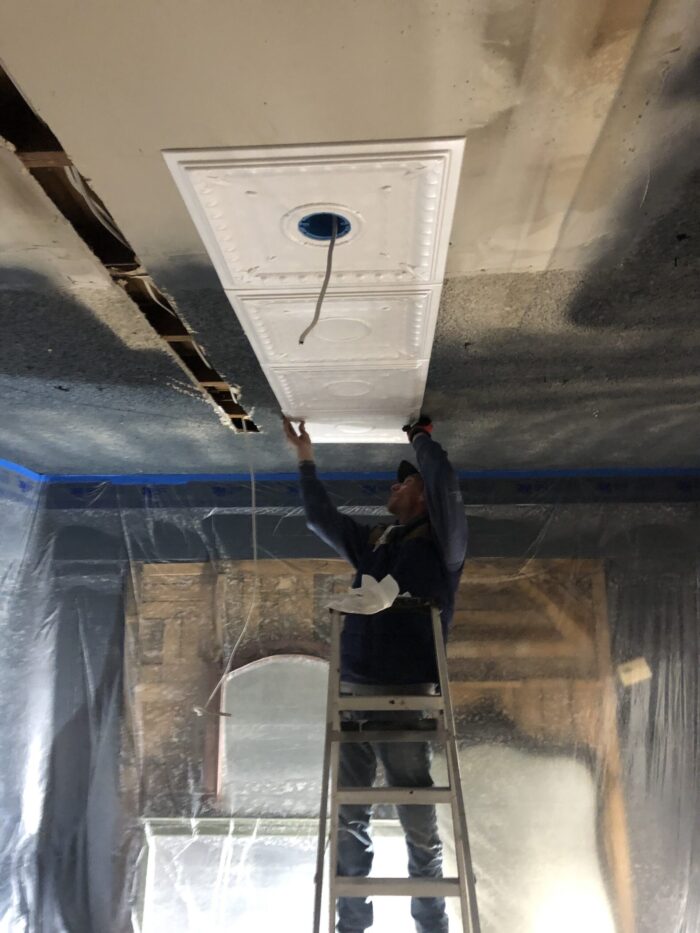
Once we installed the first tile it was easy to determine how much glue each tile would need and how to center them when they went up.
NOTE: Chad did this by eye, but they recommend either drawing/marking lines and corners to makes sure you keep a straight line OR using a laser level to help keep your lines.
The tiles will move a little before they set so you have to kind of work fast so they don’t set crooked or move before you have a chance to create a straight line/edge with your first row.
Once we knew what we were working with, we worked as an assembly line and I squeezed the glue on the backs of the tiles and lined them up for Chad to install… it was not easy and my hand was sore for days, lol, but you can see the size of dollup and placement of glue drops we put on the backs of each tile.
We worked in lines, leveling the sides to match the one prior. Chad was also working around the electrical to make sure they lined up with the holes for the can lights… he cut the ceiling holes and fitted the electrical once he knew where the tiles would line up.
We had to go back to our first tile and add more glue a few times.
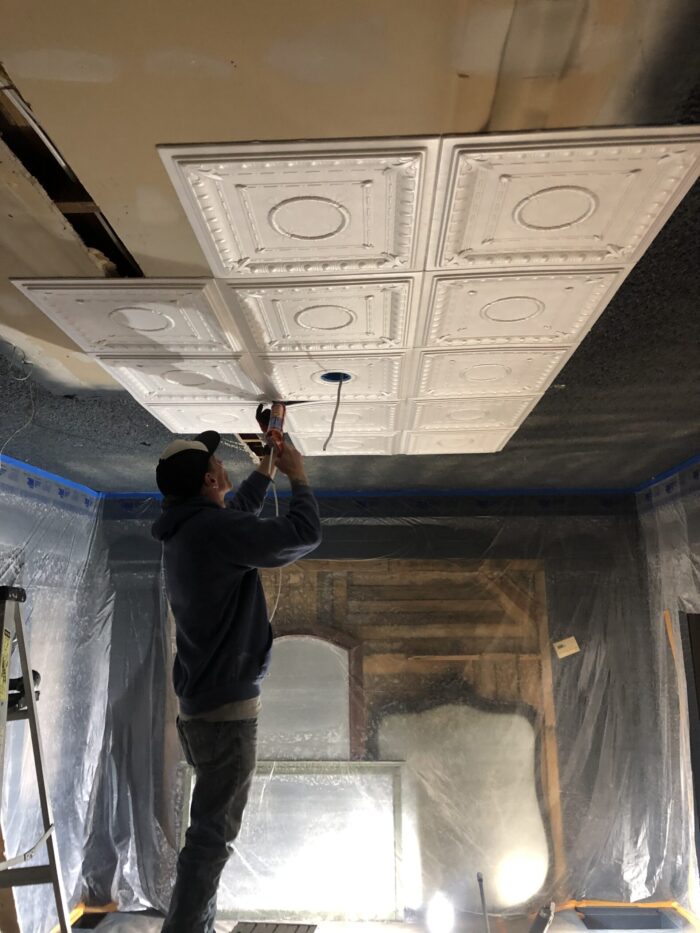
Then we just continued down the lines and out to the sides.
We had to cut the tiles on the edges with a sharp blade to fit, which was not easy but not too difficult either.
NOTE: IF you plan to add crown molding around the edges, you don’t have to be so precise, but I didn’t have the wallspace or height to add them.
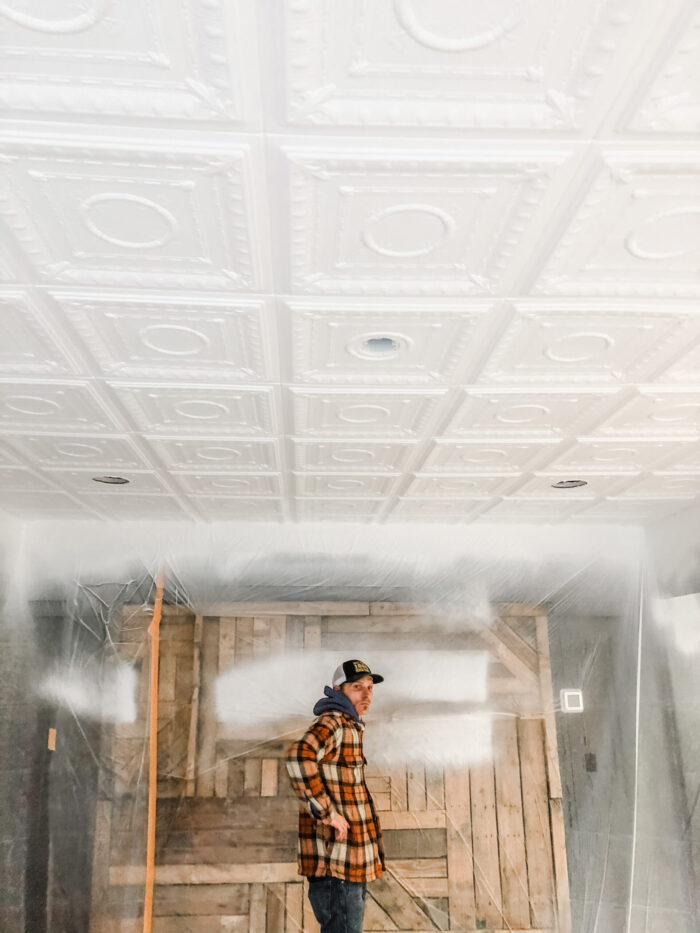
There was a moment where I wanted to save time and since the tiles looked pretty good as is, I wanted to leave them as is… but as the glue dried, we could see the dots through the tiles so we had to paint. Go back up two photos above to see the dots.
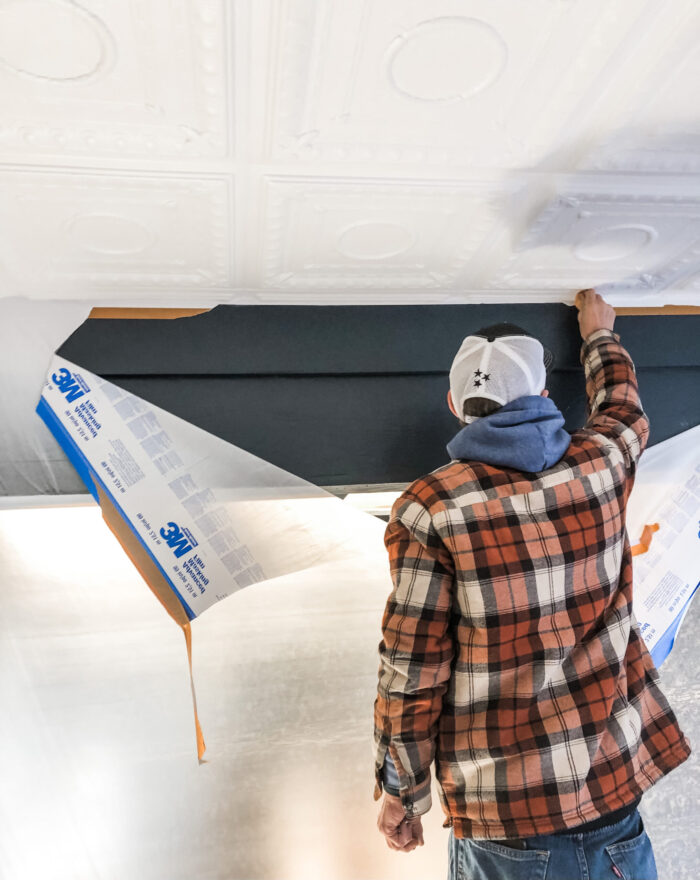
Once all the tiles were installed we taped and lined the walls with plastic and sprayed the ceiling white. We used a paint/primer in one so we didn’t have to do ten million coats. I think we did two coats to finish it off.
And then carefully pulled the tape to reveal a straight line atop the dark walls.
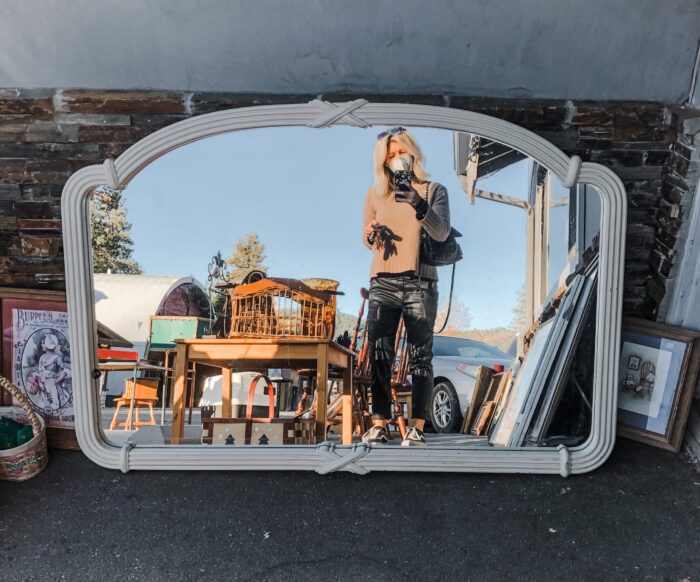
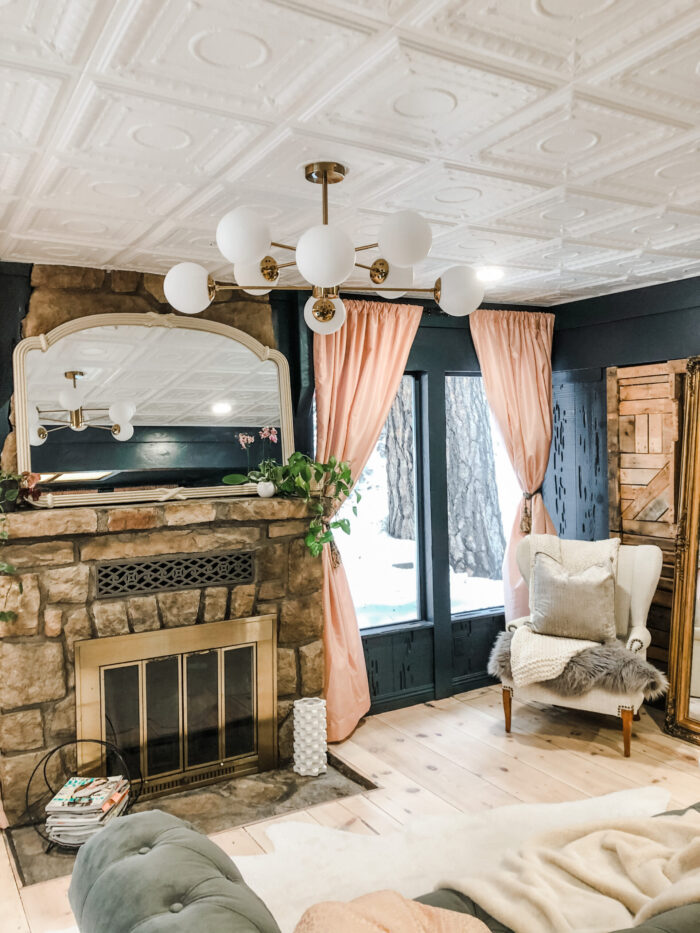
My $15 ’80s mirror…
In my quest to find my massive floor mirror (I finally and luckily did find!) I hit all the local thrift shops picking up smaller mirrors along the way. When I spotted this ’80s mirror I had to have it… when I asked the price and heard $15 I’m pretty sure my jaw dropped and I exclaimed REALLY!?!? I’ll TAKE IT! Even though I had no idea where it would end up, I loved it. It was the perfect contemporary 80s feel I wanted to add to this old world, rustic vibe I had envisioned in my mind.
I set it in front of the fireplace just to get it out of the way and realized it would fit marvelously on the mantel and that’s where it ended up.
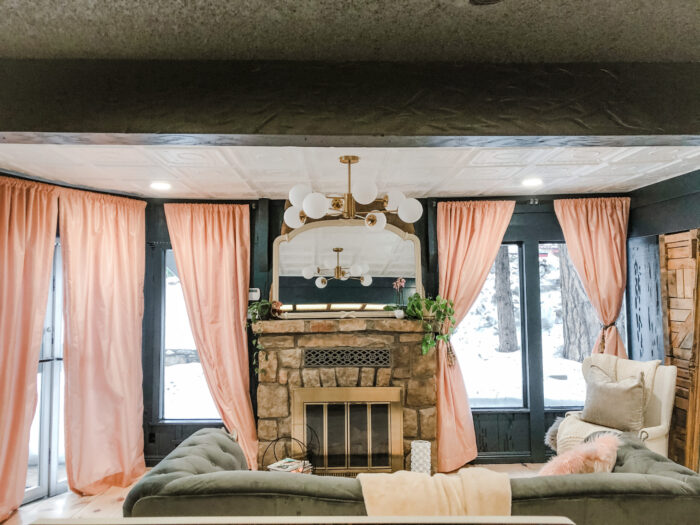
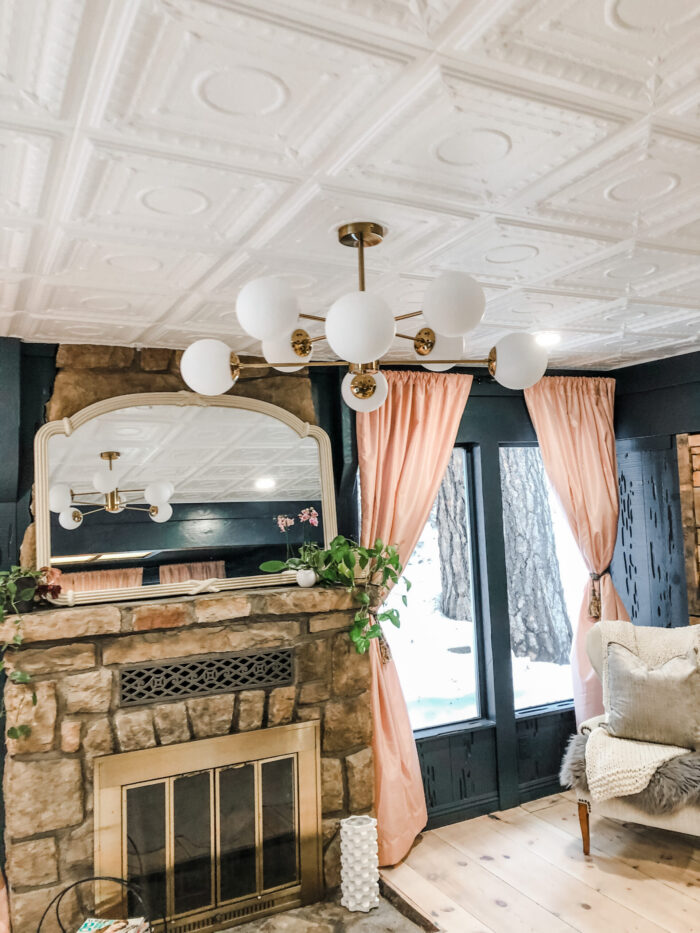
And… Voila!
I honestly LOVE the way the ceiling turned out. What a difference and it was kind of the perfect option for this space. Apologies for not getting more angles on the space, but more will come soon as I finish the space.
LA native & lifestyle creator Maegan Tintari shares personal style, outfit inspiration, home decor, beauty, DIY projects, and everyday aesthetic living here—at loveMaegan.com—an editorial-style space filled with visual inspiration and creative ideas since 2007.
For deeper personal essays on reinvention, starting over, creativity, and rebuilding life from the inside out, you can also find her writing on Substack and everywhere else as @loveMaegan
Contains information about the traffic source or campaign that directed user to the website. The cookie is set when the GA.js javascript is loaded and updated when data is sent to the Google Anaytics server
6 months after last activity
__utmv
Contains custom information set by the web developer via the _setCustomVar method in Google Analytics. This cookie is updated every time new data is sent to the Google Analytics server.
2 years after last activity
__utmx
Used to determine whether a user is included in an A / B or Multivariate test.
18 months
_ga
ID used to identify users
2 years
_gali
Used by Google Analytics to determine which links on a page are being clicked
30 seconds
_ga_
ID used to identify users
2 years
_gid
ID used to identify users for 24 hours after last activity
24 hours
_gat
Used to monitor number of Google Analytics server requests when using Google Tag Manager
1 minute
_gac_
Contains information related to marketing campaigns of the user. These are shared with Google AdWords / Google Ads when the Google Ads and Google Analytics accounts are linked together.
90 days
__utma
ID used to identify users and sessions
2 years after last activity
__utmt
Used to monitor number of Google Analytics server requests
10 minutes
__utmb
Used to distinguish new sessions and visits. This cookie is set when the GA.js javascript library is loaded and there is no existing __utmb cookie. The cookie is updated every time data is sent to the Google Analytics server.
30 minutes after last activity
__utmc
Used only with old Urchin versions of Google Analytics and not with GA.js. Was used to distinguish between new sessions and visits at the end of a session.
End of session (browser)
Marketing cookies are used to follow visitors to websites. The intention is to show ads that are relevant and engaging to the individual user.
Pinterest Tag is a web analytics service that tracks and reports website traffic.